> ## Documentation Index
> Fetch the complete documentation index at: https://docs.qbraid.com/llms.txt
> Use this file to discover all available pages before exploring further.
# Environment Manager
> Manage your quantum environments directly within Visual Studio Code.
The qBraid Environment Manager extension allows you to manage your Python quantum environments directly within Visual Studio Code. This includes creating, viewing, using, removing, editing, and sharing environments both locally and in the cloud.
### Installation
The Environment Manager extension can be installed directly through the [VS Code Marketplace](https://marketplace.visualstudio.com/items?itemName=qBraid.qbraid-environment-manager) -
 ## Managing Environments
### Create
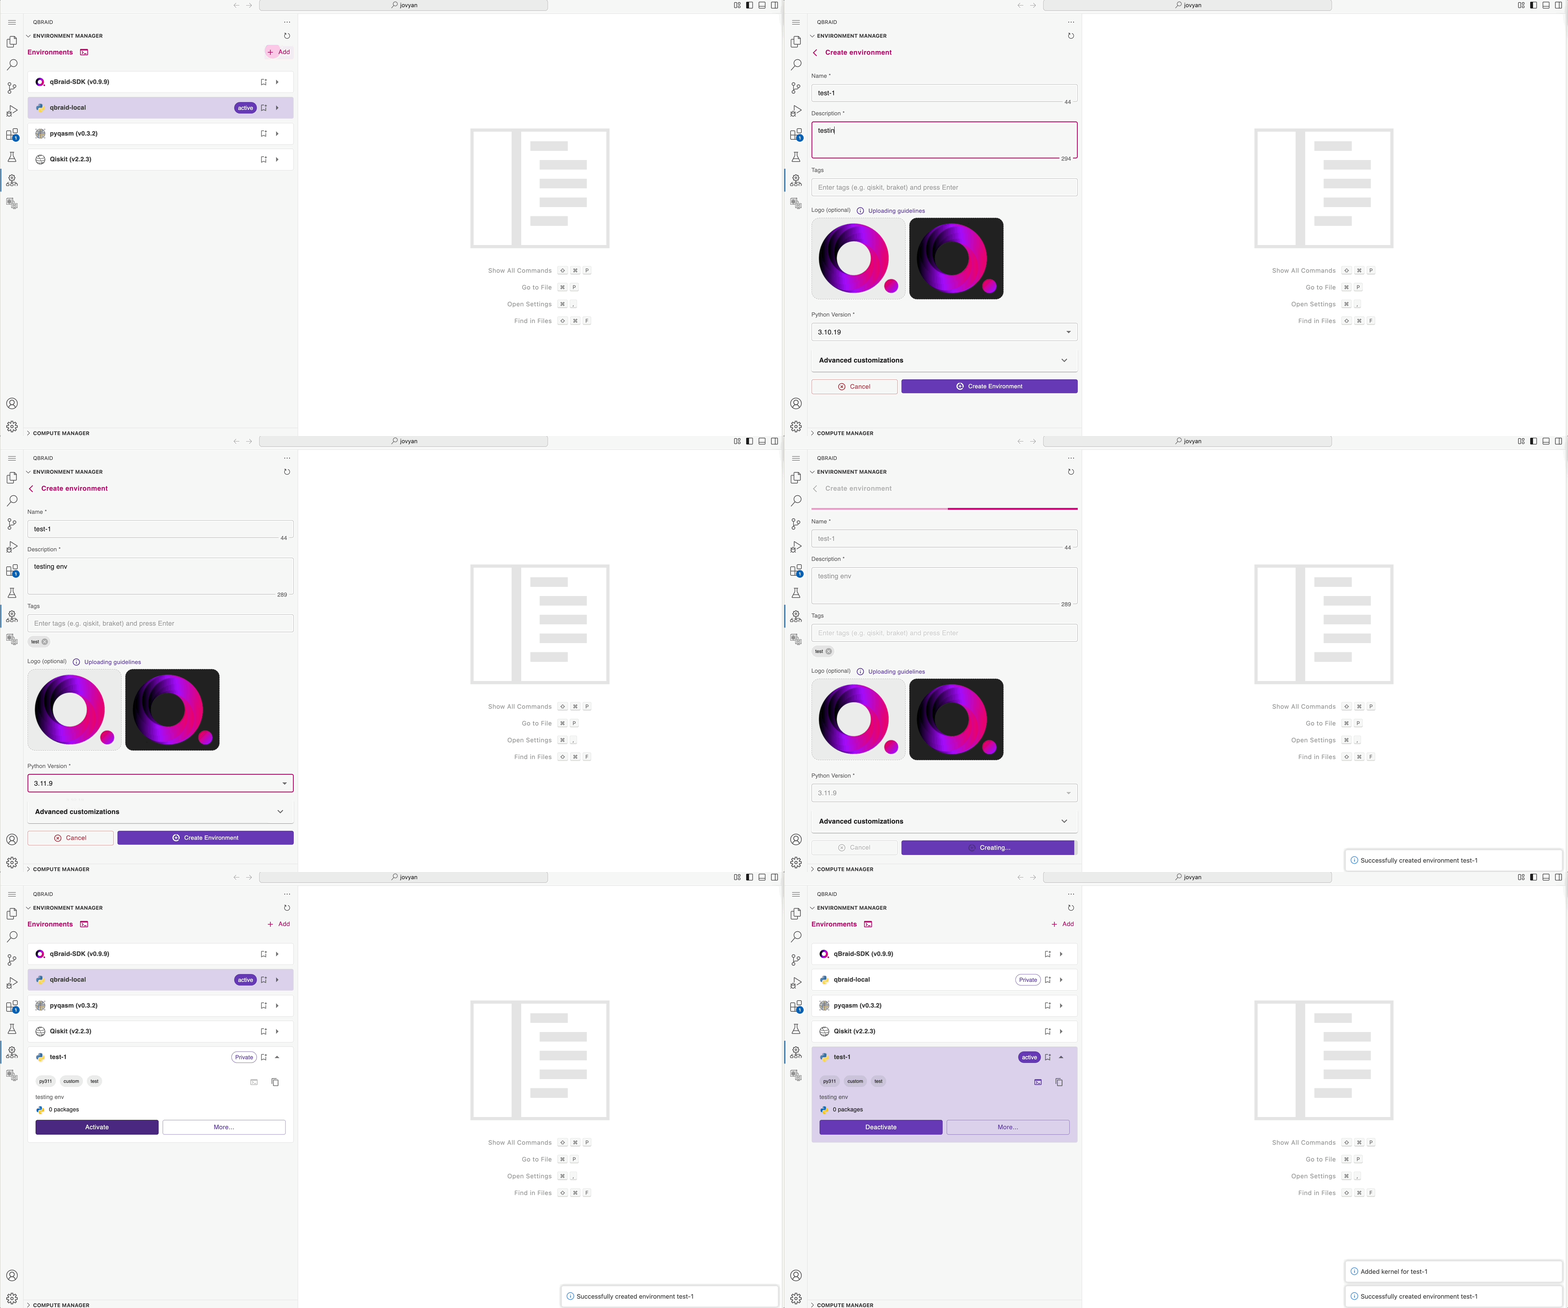
* Create a new environment by clicking on the `Add` icon in the Environment Manager panel.
* Click on the `Create Environment` button to open the environment creation dialog.
* Enter the name and description for the environment, select the Python version, tags, and packages you want to include.
* Click on the `Create` button to create the environment.
* The new environment will be created and added to the Environment Manager panel.
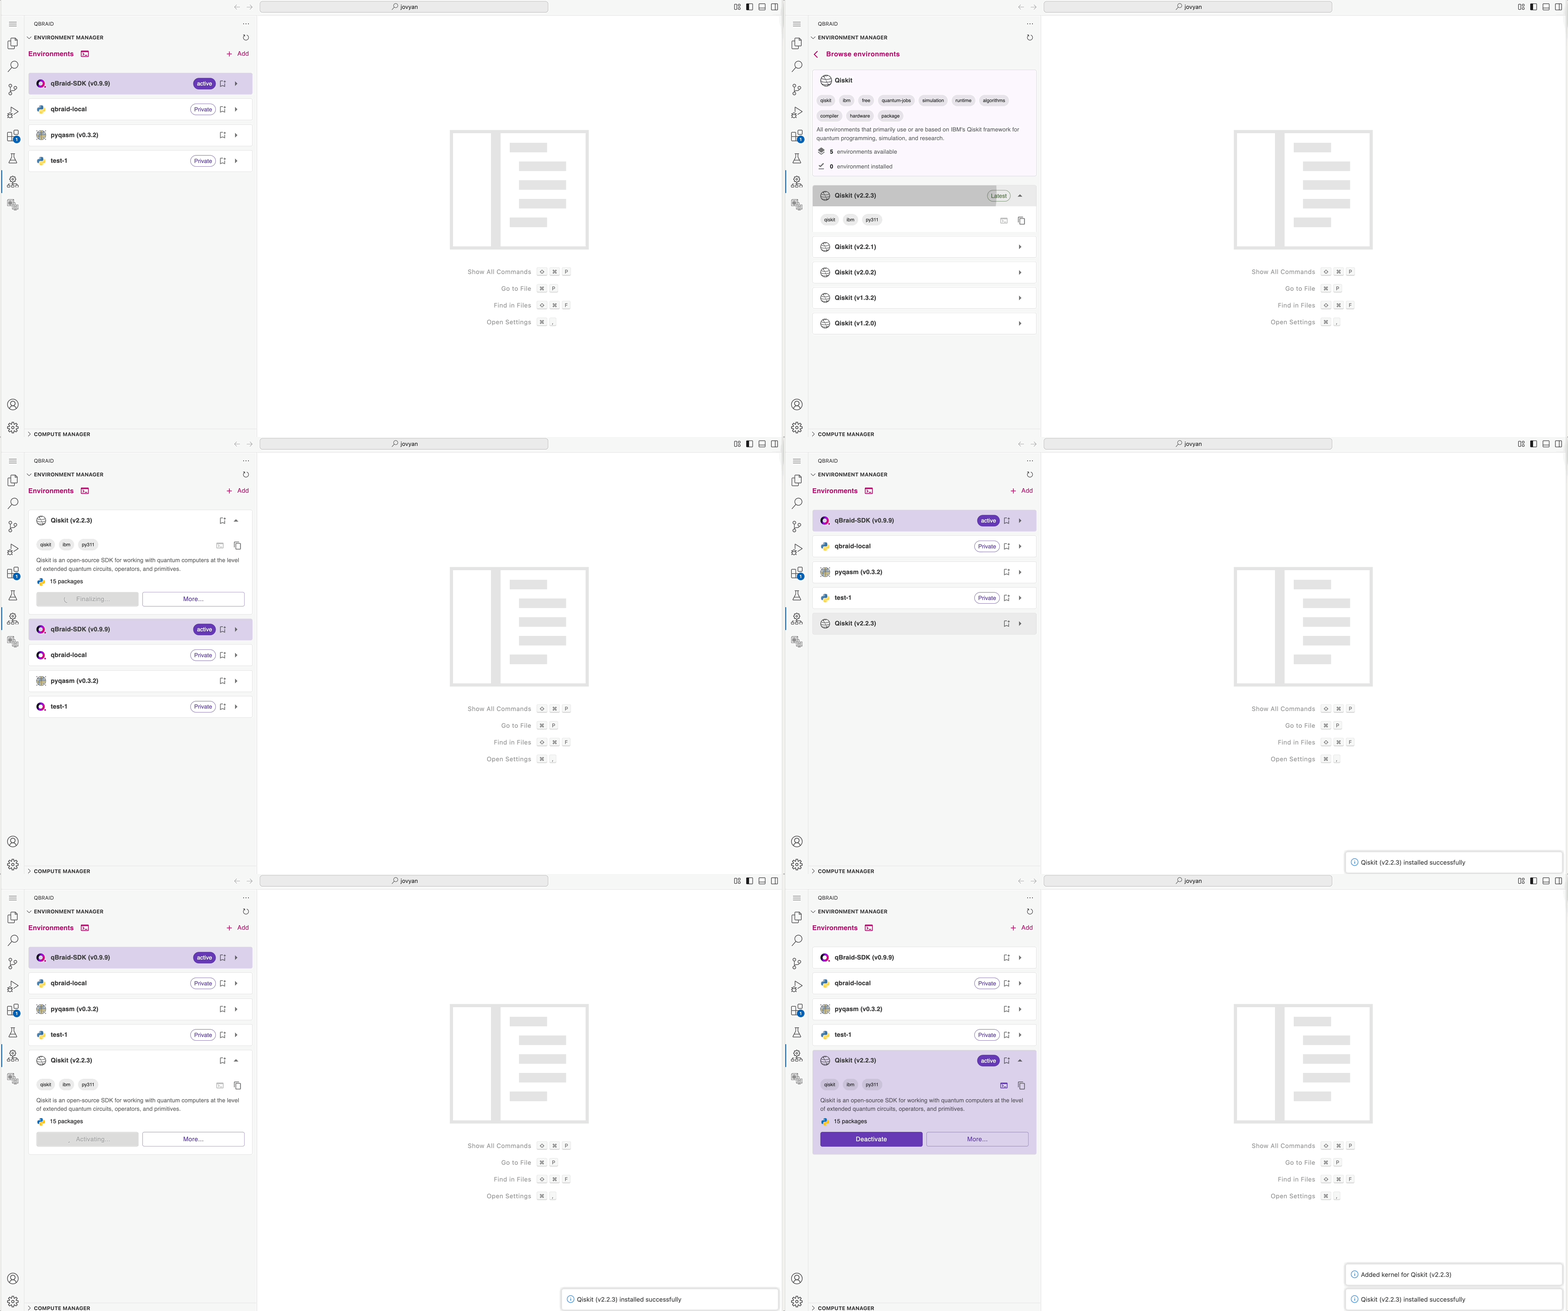
* You can also choose to install an environment from the pre-configured groups such as Qiskit, qBraid, etc. -
## Managing Environments
### Create
* Create a new environment by clicking on the `Add` icon in the Environment Manager panel.
* Click on the `Create Environment` button to open the environment creation dialog.
* Enter the name and description for the environment, select the Python version, tags, and packages you want to include.
* Click on the `Create` button to create the environment.
* The new environment will be created and added to the Environment Manager panel.
* You can also choose to install an environment from the pre-configured groups such as Qiskit, qBraid, etc. -
 ### View
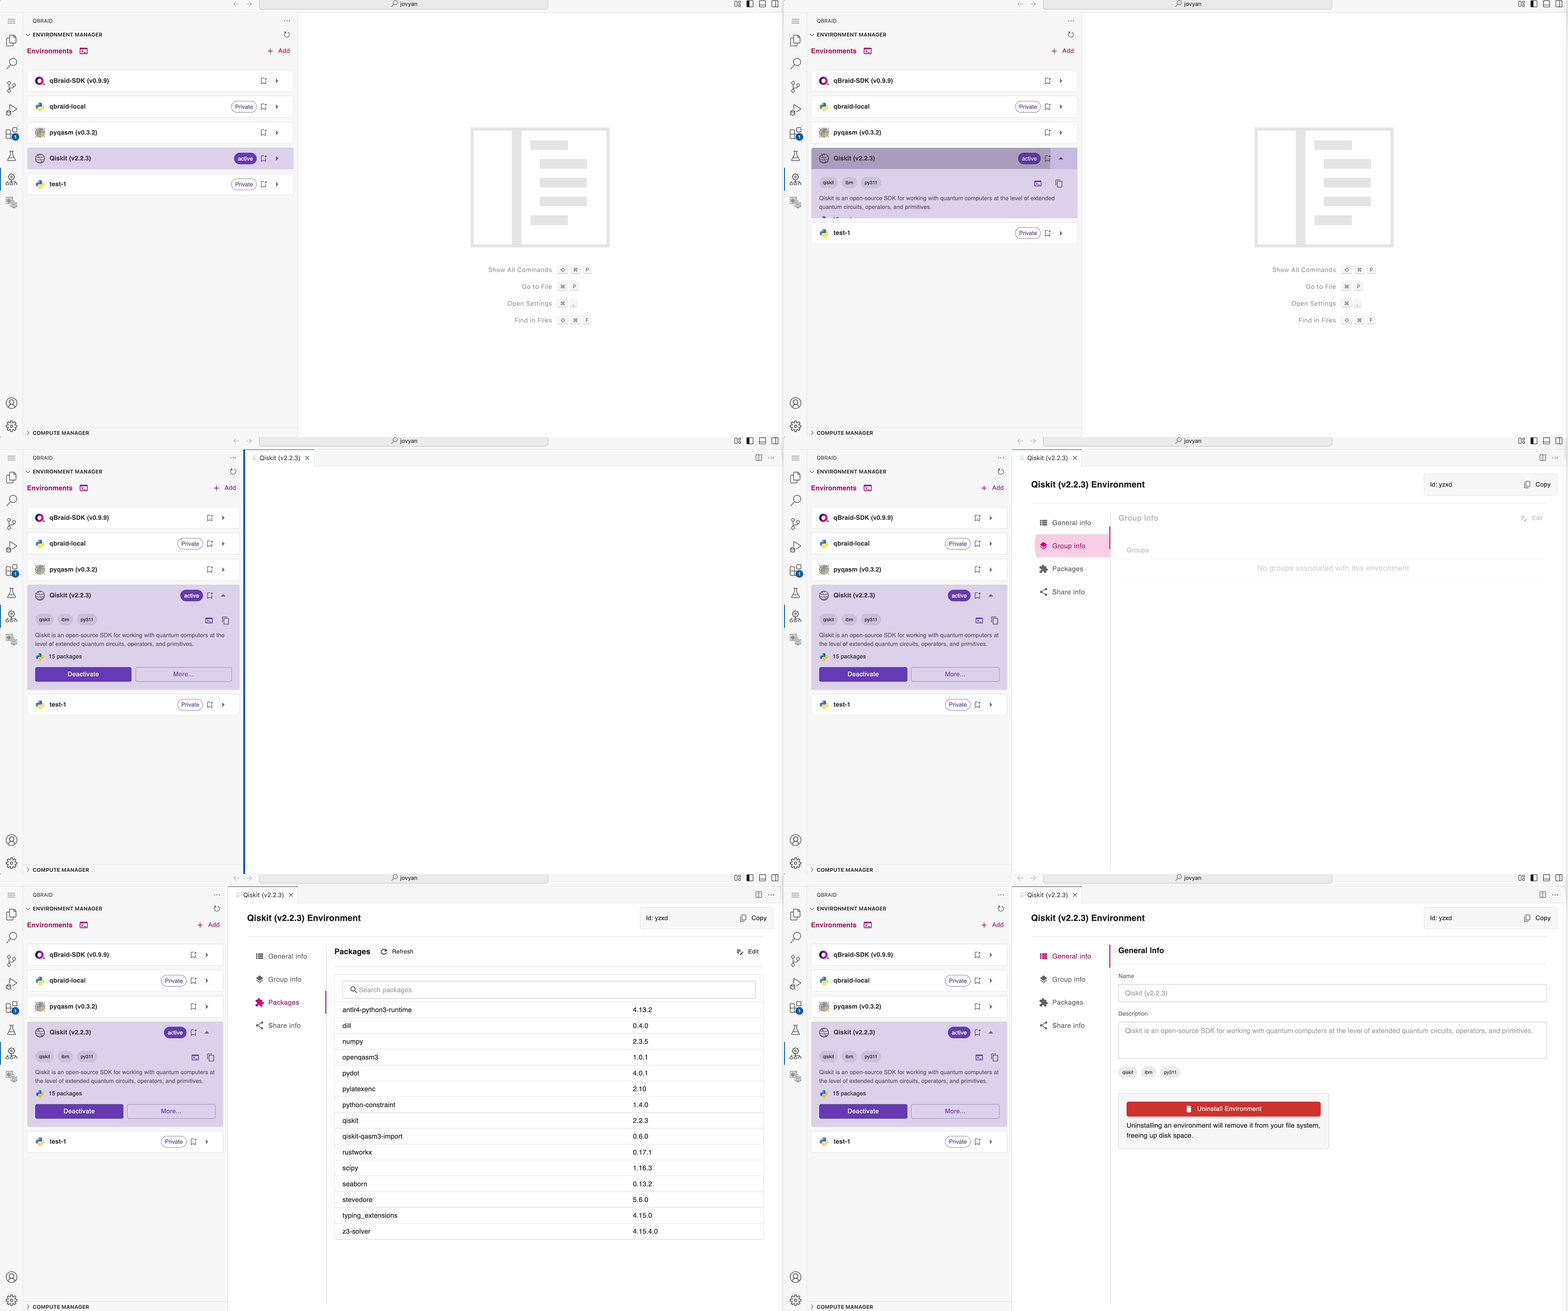
* You can view the created Python environments on the Environment Manager panel.
* Click on the `Environment Manager` icon in the Activity Bar on the side of the VS Code window. This will open up the Environment Manager panel where you can see all of your current installed environments.
* You can expand the dropdown pertaining to each environment to see more details, such as the Python version, packages installed, and whether it is currently active.
* Clicking on the `More` button will open up a separate panel with additional options for that environment, such as viewing and updating installed Python packages,
or sharing the environment with others.
{" "}
### View
* You can view the created Python environments on the Environment Manager panel.
* Click on the `Environment Manager` icon in the Activity Bar on the side of the VS Code window. This will open up the Environment Manager panel where you can see all of your current installed environments.
* You can expand the dropdown pertaining to each environment to see more details, such as the Python version, packages installed, and whether it is currently active.
* Clicking on the `More` button will open up a separate panel with additional options for that environment, such as viewing and updating installed Python packages,
or sharing the environment with others.
{" "}
 ### Use
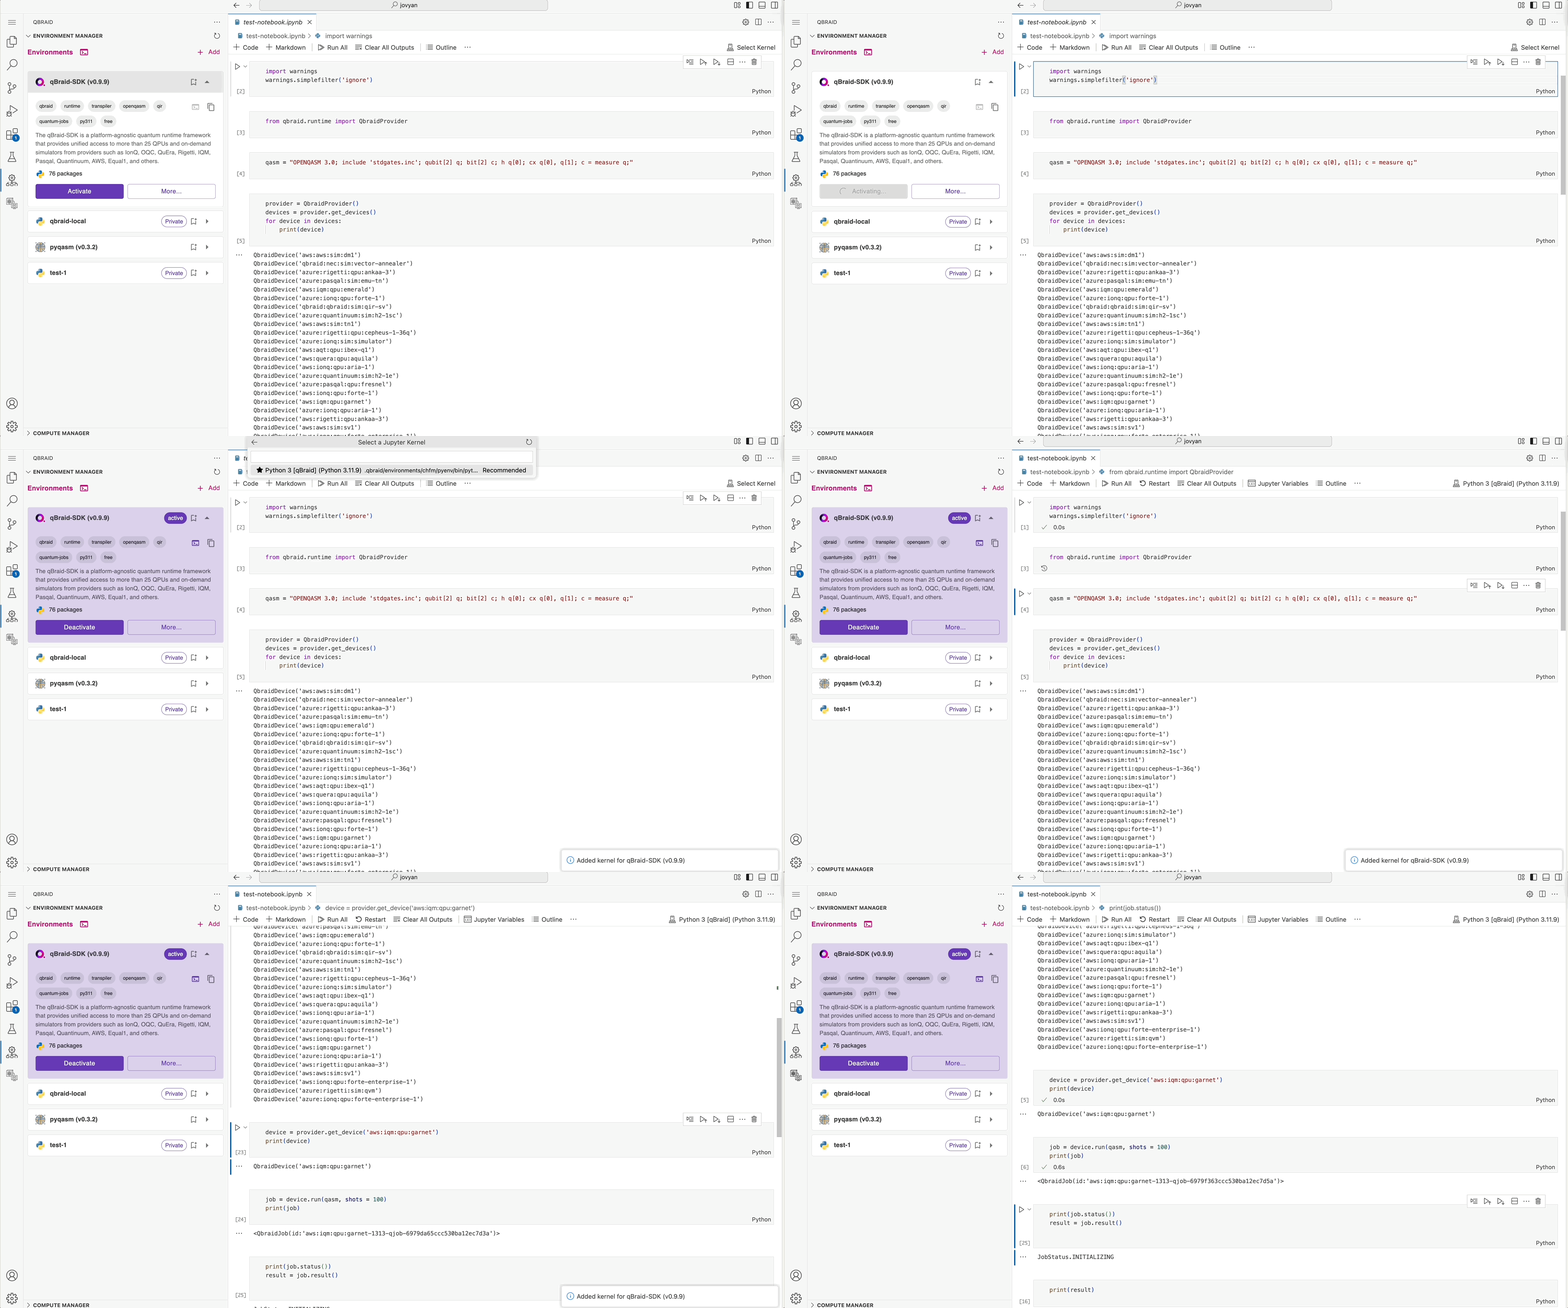
* Expand the dropdown for the environment you want to use and click on the `Activate` button.
* Once activated, click on the `Select Kernel` icon. This will open the selection dialog for choosing the Python kernel.
* Select the kernel corresponding to the activated environment.
* You can now run Python commands in this terminal using the selected environment.
### Use
* Expand the dropdown for the environment you want to use and click on the `Activate` button.
* Once activated, click on the `Select Kernel` icon. This will open the selection dialog for choosing the Python kernel.
* Select the kernel corresponding to the activated environment.
* You can now run Python commands in this terminal using the selected environment.
 ### Edit
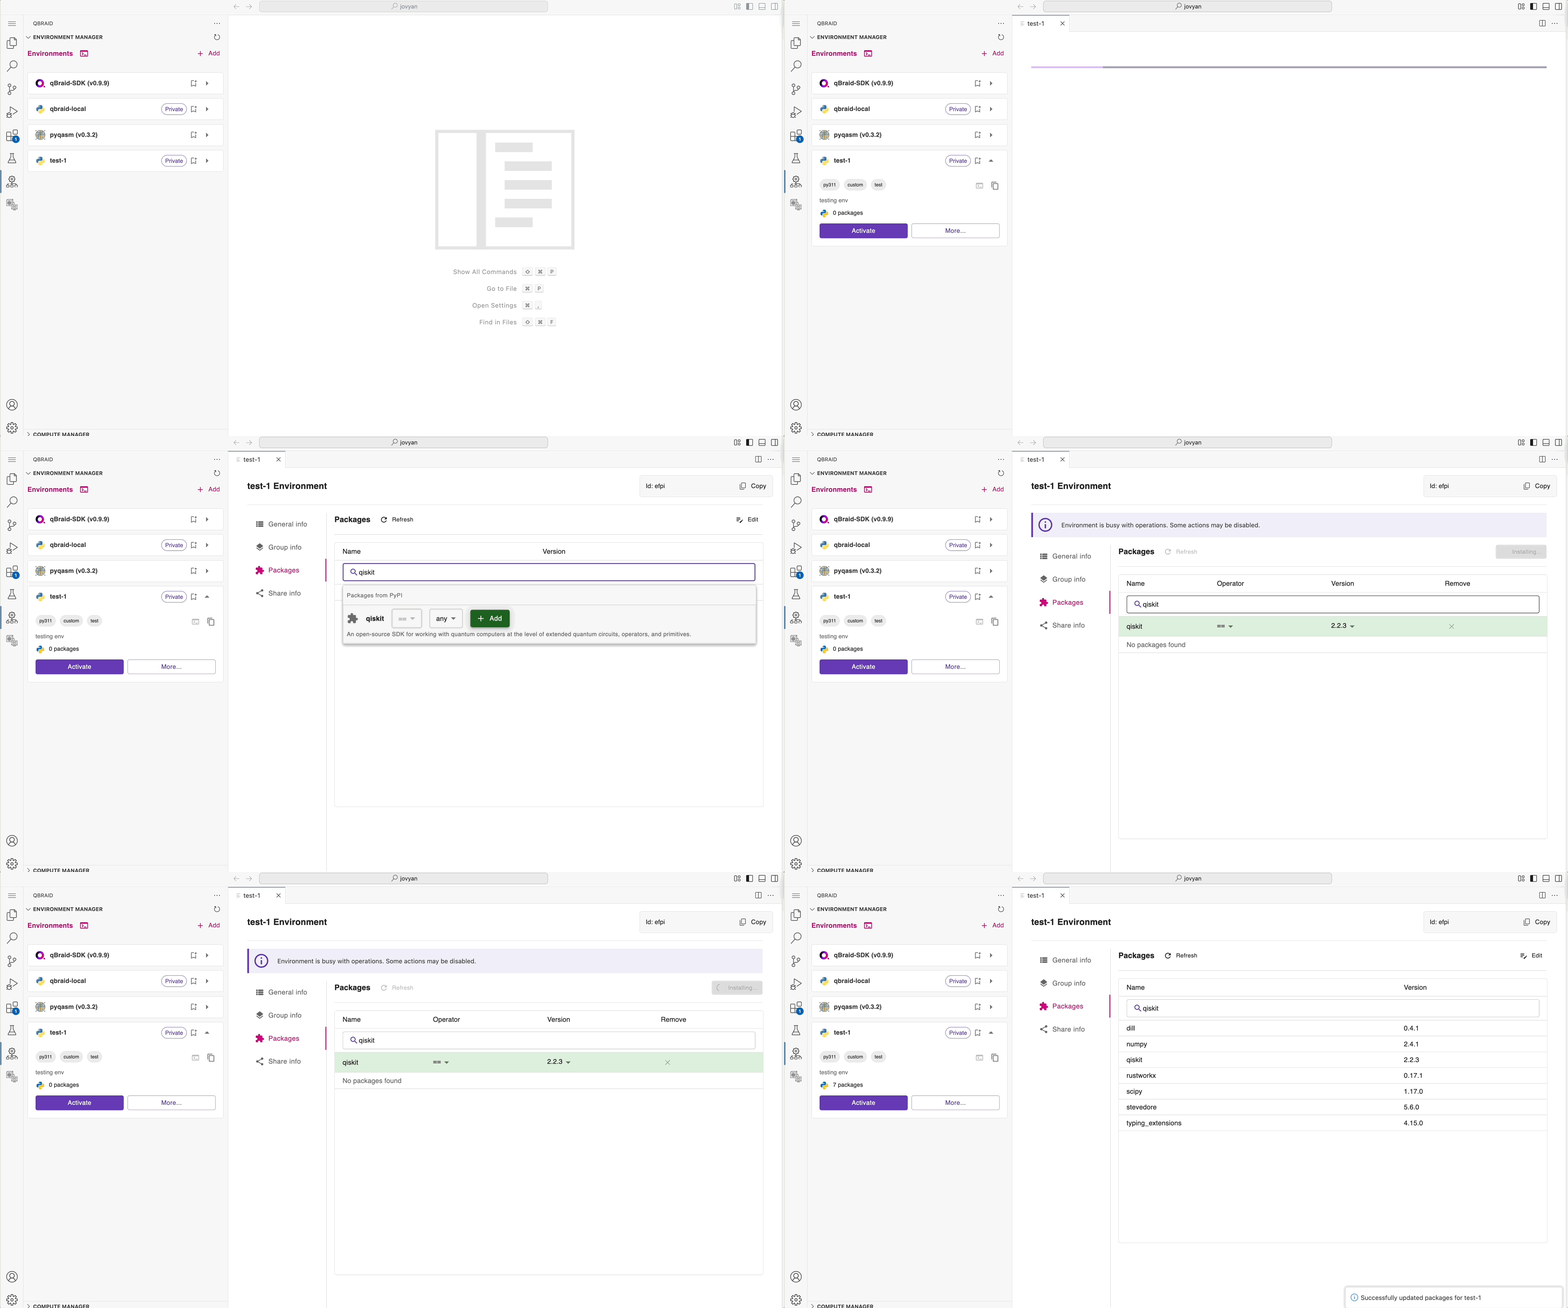
* Clicking on the `More` button will open up a separate panel with additional options for that environment.
* You can edit the environment general info by clicking on the `Edit` button. This will allow you to change the name, description, and other details of the environment.
* You can also add/remove packages from the environment by clicking on the `Packages` tab in the same panel:
* **Add**: Search for the package you want to add, select a version, and click on the `Add` button
* **Remove**: Click on the `Remove` button next to the package.
* Once you have made all the changes, click on the `Update` button to apply them
### Edit
* Clicking on the `More` button will open up a separate panel with additional options for that environment.
* You can edit the environment general info by clicking on the `Edit` button. This will allow you to change the name, description, and other details of the environment.
* You can also add/remove packages from the environment by clicking on the `Packages` tab in the same panel:
* **Add**: Search for the package you want to add, select a version, and click on the `Add` button
* **Remove**: Click on the `Remove` button next to the package.
* Once you have made all the changes, click on the `Update` button to apply them
 ### Uninstall
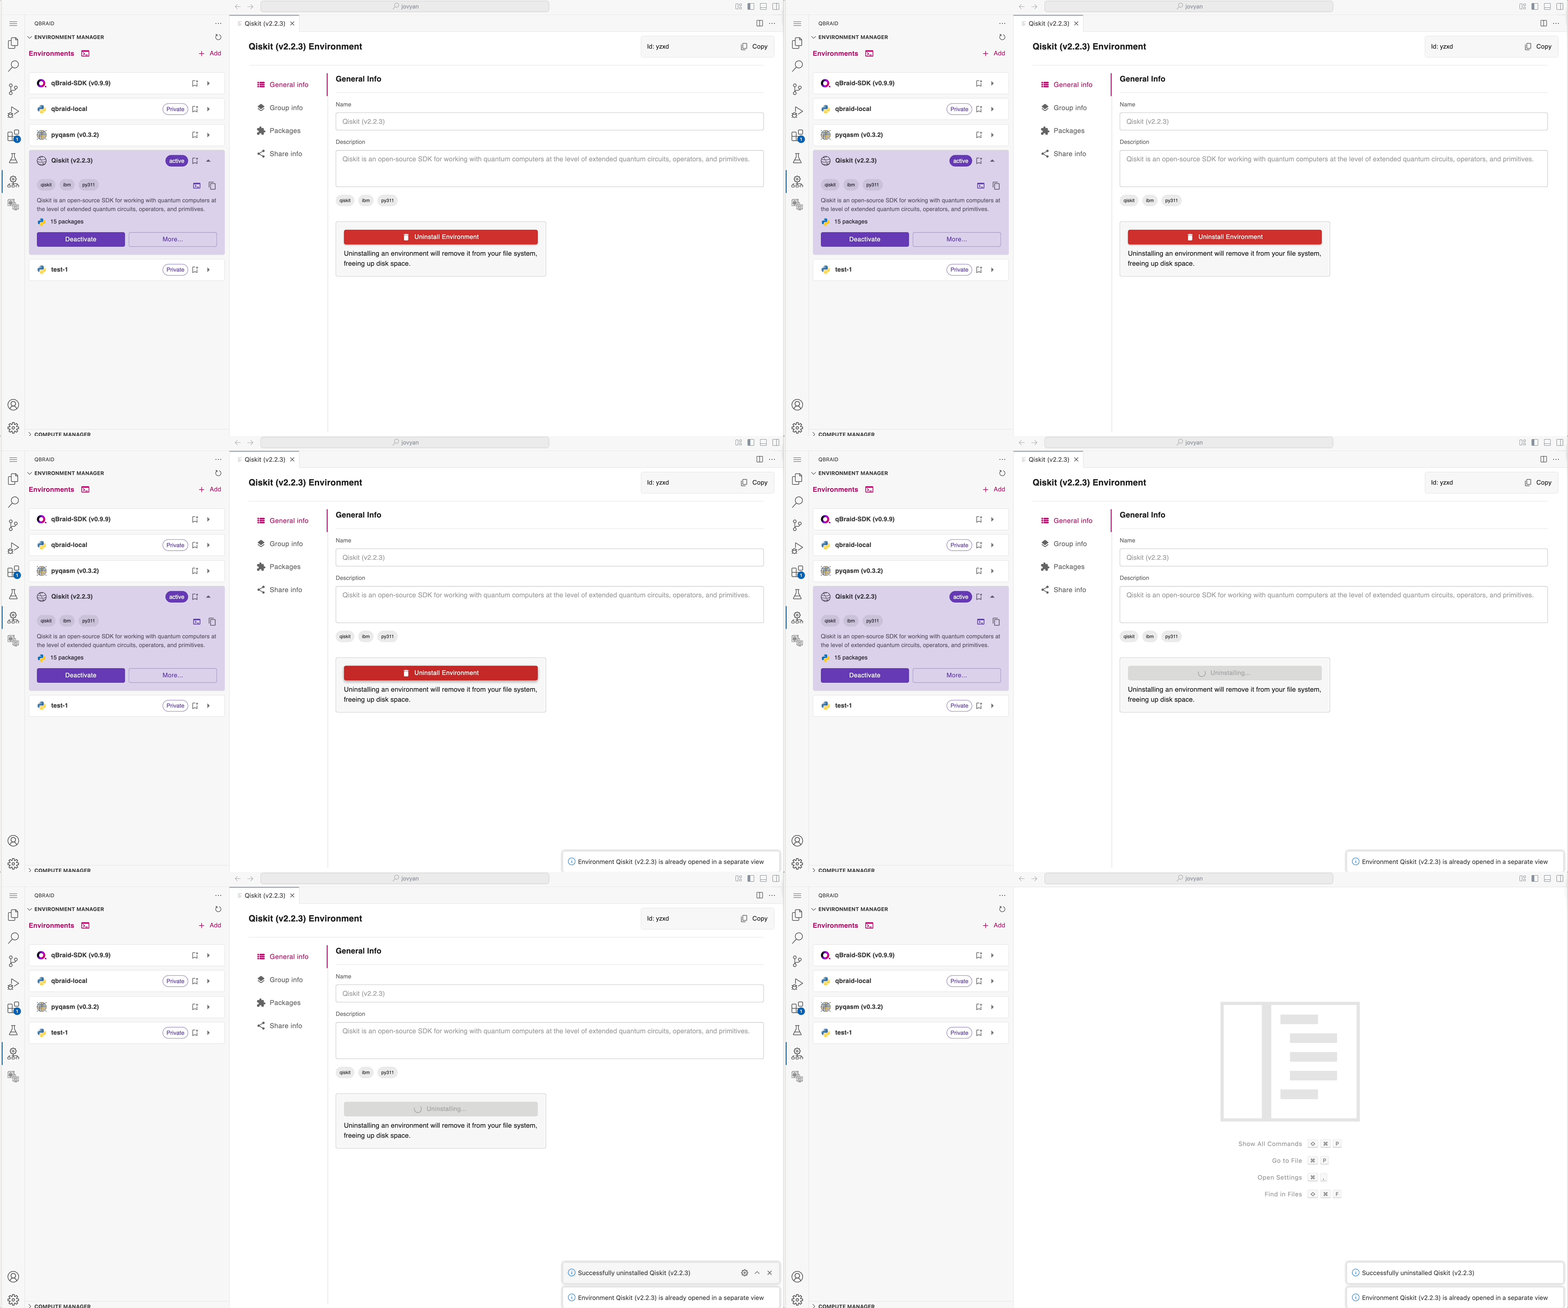
* Click on the `More` button and select the `Uninstall Environment` option.
* A confirmation dialog will appear asking you to confirm the removal of the environment. Once confirmed,
the environment will be removed from your local machine or qBraid Lab instance (if it is a cloud environment).
### Uninstall
* Click on the `More` button and select the `Uninstall Environment` option.
* A confirmation dialog will appear asking you to confirm the removal of the environment. Once confirmed,
the environment will be removed from your local machine or qBraid Lab instance (if it is a cloud environment).
 ### Share
* Click on the `More` button and select the `Share Info` option.
* You can choose to share the environment via:
* **Email**: Enter the email address of the recipient and click on the `Share` button.
* **Access Code**: Click on the `Generate Access Code` button. This will generate a unique access code that can be shared with others to access the environment.
The recipient can then use this code to access the environment in their own qBraid account.
## Managing Compute Resources
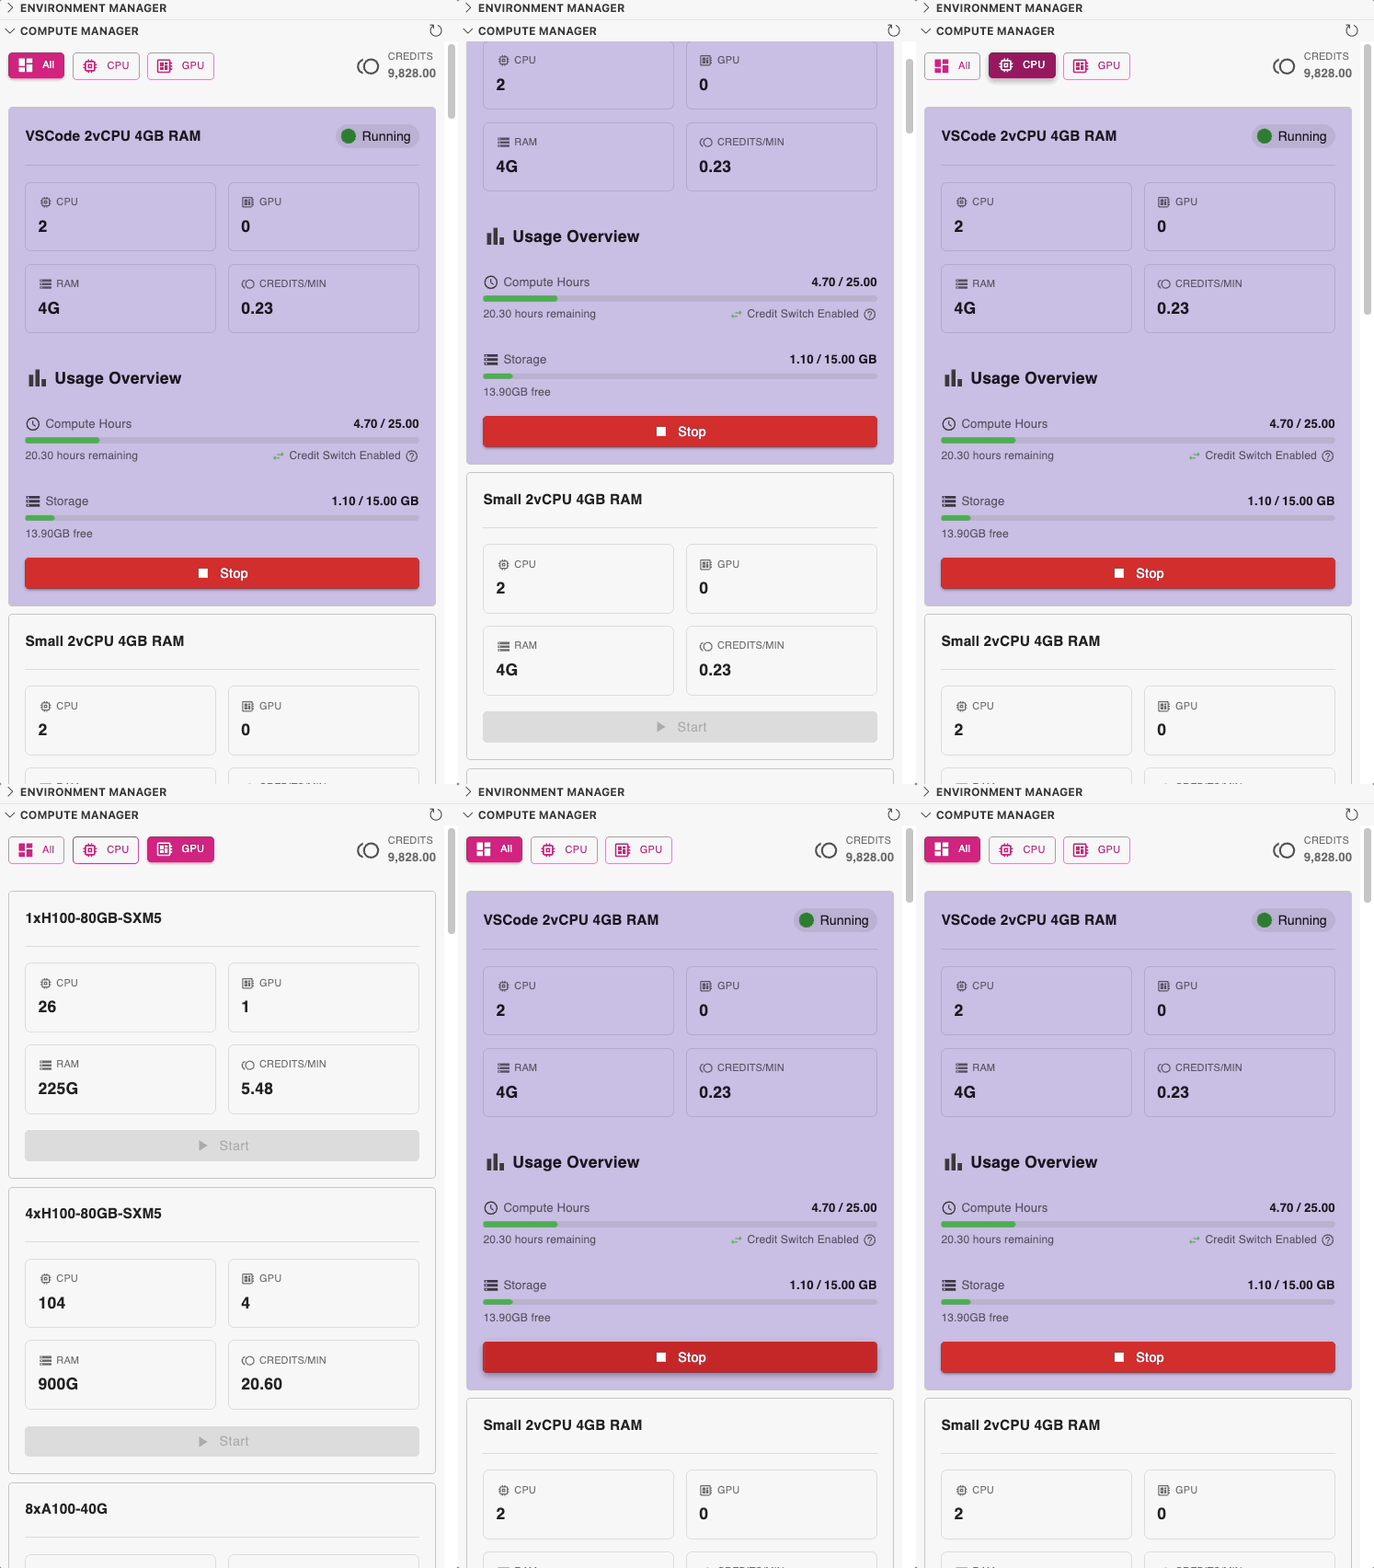
* As part of the Environment Manager is the **Compute Manager** extension, which allows you to connect to and manage remote qBraid Lab compute resources, including CPUs and NVIDIA GPUs.
* The Compute Manager allows you to:
* View available compute resources in the qBraid Lab.
* Activate or deactivate compute resources.
* View the status of your compute resources.
* Manage your compute instances directly from Visual Studio Code.
* To utilize the `Cloud` functionality of the Environment Manager, you must have a running instance of the [qBraid Lab](/v2/lab/user-guide/overview).
### Share
* Click on the `More` button and select the `Share Info` option.
* You can choose to share the environment via:
* **Email**: Enter the email address of the recipient and click on the `Share` button.
* **Access Code**: Click on the `Generate Access Code` button. This will generate a unique access code that can be shared with others to access the environment.
The recipient can then use this code to access the environment in their own qBraid account.
## Managing Compute Resources
* As part of the Environment Manager is the **Compute Manager** extension, which allows you to connect to and manage remote qBraid Lab compute resources, including CPUs and NVIDIA GPUs.
* The Compute Manager allows you to:
* View available compute resources in the qBraid Lab.
* Activate or deactivate compute resources.
* View the status of your compute resources.
* Manage your compute instances directly from Visual Studio Code.
* To utilize the `Cloud` functionality of the Environment Manager, you must have a running instance of the [qBraid Lab](/v2/lab/user-guide/overview).