> ## Documentation Index
> Fetch the complete documentation index at: https://docs.qbraid.com/llms.txt
> Use this file to discover all available pages before exploring further.
# Intel® Quantum SDK
> How to set up the Intel® Quantum SDK in qBraid
## Overview
Intel® Quantum SDK is a C++ based API that allows users to write software targeted for Intel quantum hardware. It is available as a
pre-installed environment on qBraid Lab, and is free to access for all users.
To cite the Intel® Quantum SDK, please reference:
> Khalate, P., Wu, X.-C., Premaratne, S., Hogaboam, J., Holmes, A., Schmitz, A., Guerreschi, G. G., Zou, X. & Matsuura, A. Y., [arXiv:2202.11142 (2022)](https://doi.org/10.48550/arXiv.2202.11142)
## Getting Started
### Select Image & Launch Lab
At the top of your account page, open the image drop down. Select the option named **Intel Free 2vCPU 4GB**, and then click Launch Lab.
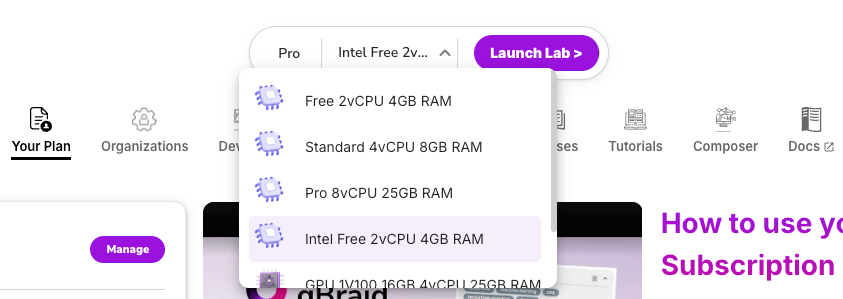
Pulling the Intel image may take 2-3 minutes the first time. The next time you launch Lab, it will load much more quickly.
### Add Python kernel
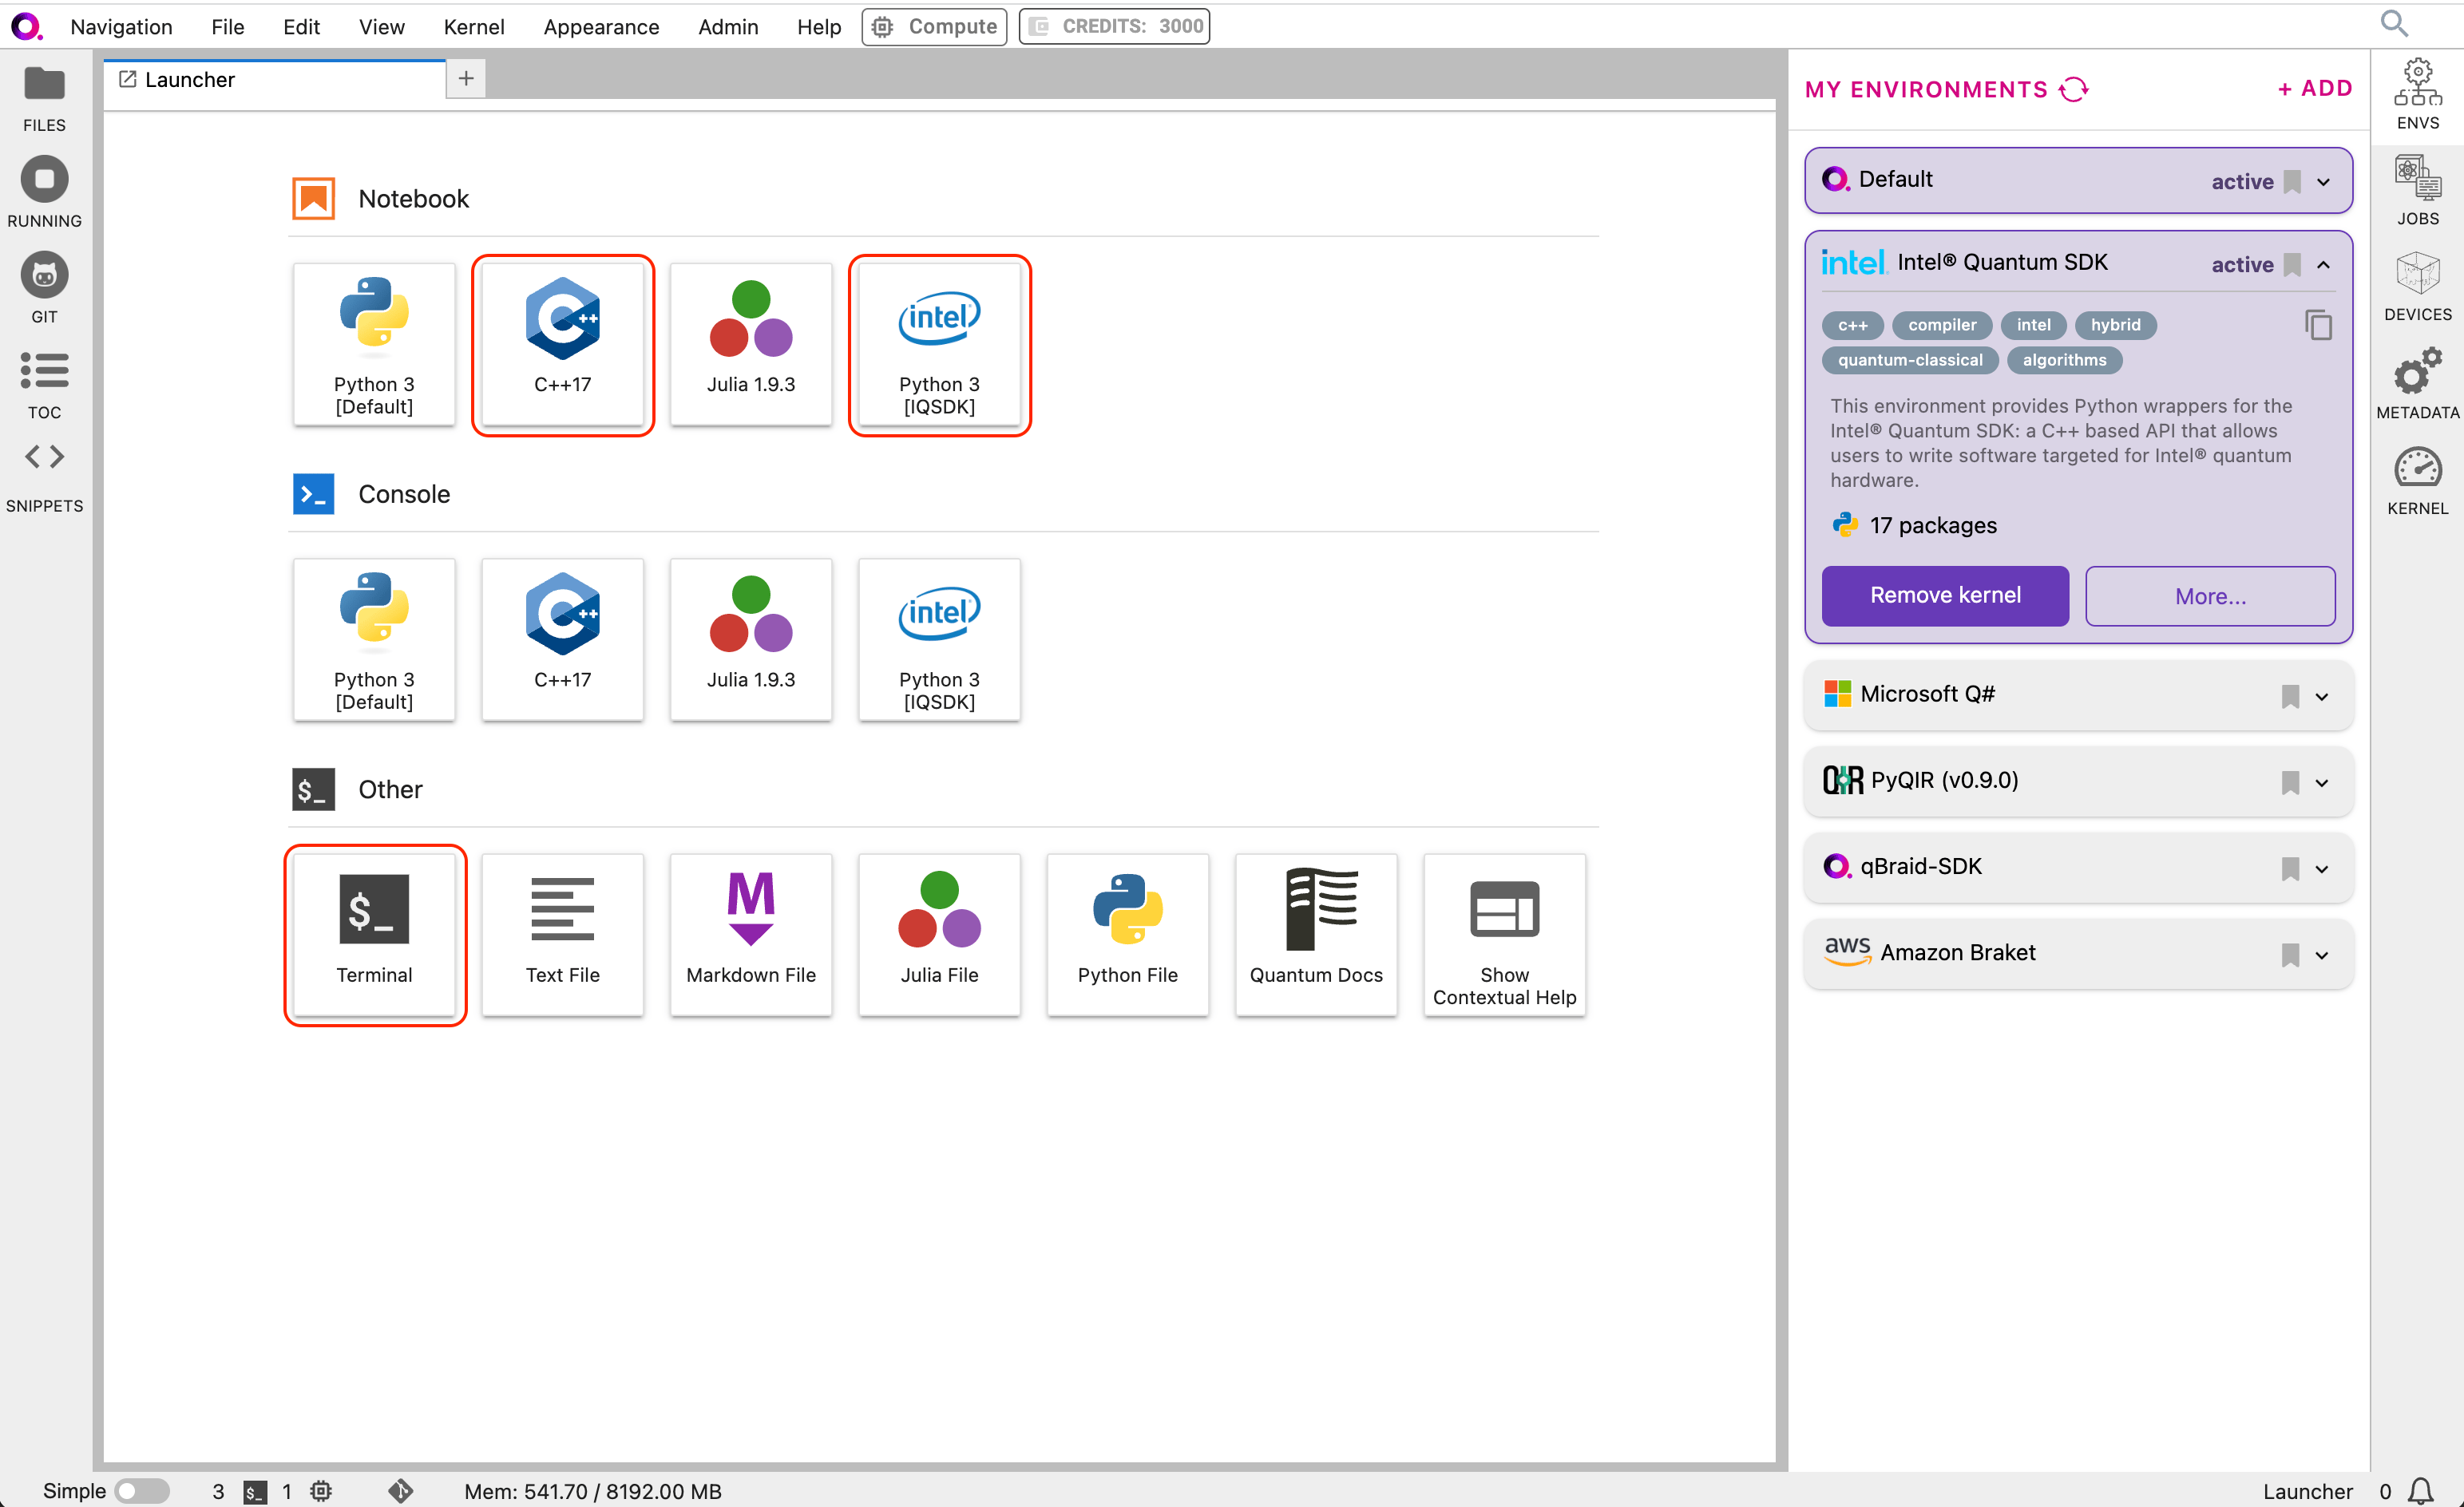
The Intel® Quantum SDK is designed to interoperate with Python software environments. To use this feature, in the
right sidebar of qBraid Lab, locate and expand the Intel® Quantum SDK environment panel and click **Add Kernel**.
This will create a new Python 3 kernel (marked `IQSDK`), which you will use to create and run your first notebook.
## Python Interface
The Intel® Quantum SDK Python Interface provides an API to run quantum algorithms using Python 3, through the **intelqsdk.cbindings** library.
The standard approach to using the Intel® Quantum SDK is to provide a `quantum_kernel` as C++ source in your Python environment and then
expose that kernel for operation. A second approach for interacting with Python is via the Intel® Quantum Compiler OpenQASM Bridge:
1. Write `quantum_kernel` functions in C++, compile to a `.so` shared object file, setup the Intel® Quantum Simulator and call the
`intelqsdk.cbindings` APIs from Python.
2. Write quantum circuits in OpenQASM 2.0, convert that to a `quantum_kernel` source in C++, and use the `intelqsdk.cbindings`
library as before, all from within Python.
## qBraid Specific Instructions
On qBraid, the Intel® Quantum SDK Python interface is installed in a dedicated virtual environment
with environment ID `intel_dk7c2g`.
Before running a notebook, make sure that the Intel® Quantum SDK kernel is [active](/lab/user-guide/kernels). Then,
make sure it is [enabled](/lab/user-guide/notebooks#switch-notebook-kernel) for the current notebook by selecting
`Python [IQSDK]` in the kernel selector in the top-right of your menu bar.
For terminal users, the environment path is discoverable via the qBraid CLI as follows:
```bash theme={null}
$ qbraid envs list
# installed environments:
#
default /opt/.qbraid/environments/qbraid_000000
intel /opt/.qbraid/environments/intel_dk7c2g
...
```
To run your Python scripts using the **intelqsdk.cbindings** library, active the environment:
```
$ qbraid envs activate intel
$ python3
```
Or, call your script directly by specifying the full path to the python3 executable:
```
$ /opt/.qbraid.environments/indel_dk7c2g/pyenv/bin/python3
```
The Intel® Quantum Compiler is also located in the same `intel` environment directory.
```
/opt/.qbraid/environments/intel_dk7c2g/intel-quantum-compiler
```
The Intel® [oneAPI](https://www.intel.com/content/www/us/en/developer/tools/oneapi/overview.html) toolkit also comes pre-installed on qBraid,
and can be accessed at
```bash theme={null}
/opt/intel/oneapi
```
## Your First C++ Quantum Kernel
We will create and manipulate a `quantum_kernel` running on the Intel® Quantum Simulator directly in your notebook. This first kernel will
demonstrate a simple quantum Bell state as a common and familiar quantum computing example.
```python theme={null}
import intelqsdk.cbindings as iqsdk
compiler = "/opt/.qbraid/environments/intel_dk7c2g/intel-quantum-compiler"
num_qubits = 2
# Create the Python interpolated 2 qubit C++ Bell state source
Bell_source = f"""
#include
// Establish the classical and quantum kernel variables
cbit c[{num_qubits}];
qbit q[{num_qubits}];
// Our Bell state Quantum Kernel
quantum_kernel void bell()
{{
H(q[0]);
CNOT(q[0], q[1]);
MeasZ(q[0], c[0]);
MeasZ(q[1], c[1]);
}}
"""
# Create the Intel® Quantum SDK source file bell.cpp
with open("bell.cpp", "w", encoding="utf-8") as output_file:
print(Bell_source, file=output_file)
# Generate the Intel® Quantum SDK shared object file bell.so
iqsdk.compileProgram(compiler, "bell.cpp", "-s")
# Expose and label the Intel® Quantum SDK shared object as "my_bell"
iqsdk.loadSdk("./bell.so", "my_bell")
# Setup the Intel® Quantum Simulator to execute the quantum kernel
iqs_config = iqsdk.IqsConfig()
iqs_config.num_qubits = num_qubits
iqs_config.simulation_type = "noiseless"
iqs_device = iqsdk.FullStateSimulator(iqs_config)
iqs_device.ready()
# Invoke the quantum_kernel "bell" defined in the C++ source above
iqsdk.callCppFunction("bell", "my_bell")
# Establish references to the quantum kernel qubits
qbit_ref = iqsdk.RefVec()
for i in range(num_qubits):
qbit_ref.append( iqsdk.QbitRef("q", i, "my_bell").get_ref() )
# Print the probabilities of the quantum system
probabilities = iqs_device.getProbabilities(qbit_ref)
iqsdk.FullStateSimulator.displayProbabilities(probabilities, qbit_ref)
# Printing probability register of size 4
# |00> : 0 |10> : 0
# |01> : 0 |11> : 1
```
## OpenQASM Support
Intel® Quantum SDK provides a source-to-source converter which takes OpenQASM code and converts it into C++ for use with the Intel® Quantum SDK.
This converter requires Python >= 3.10. Currently, it only processes OpenQASM 2.0 compliant code as described by the Open Quantum Assembly Language
paper: [arXiv:1707.03429](https://arxiv.org/abs/1707.03429).
To translate an OpenQASM source to a C++ file, you can run the Intel® Quantum Compiler with the -B flag to generate the corresponding
`quantum_kernel` functions in C++ source format. If you are working from the terminal CLI with a pre-existing OpenQASM file simply
use the following syntax to create your C++ `quantum_kernel` source file:
```bash theme={null}
$ intel-quantum-compiler -B example.qasm
```
Working with inline OpenQASM content insert the following code into the above notebook, replacing the two sections there identified by comments
starting with “Create ” and re-run:
```python theme={null}
# Create the Python interpolated 2 qubit OpenQASM Bell state source
Bell_source = f"""
OPENQASM 2.0;
qreg q[{num_qubits}];
creg c[{num_qubits}];
h q[0];
cx q[0],q[1];
measure q[0] -> c[0];
measure q[1] -> c[1];
"""
# Create the OpenQASM 2.0 source file bell.qasm
with open("bell.qasm", "w", encoding="utf-8") as output_file:
print(Bell_source, file=output_file)
# Create the Intel® Quantum SDK source file bell.cpp
iqsdk.compileProgram(compiler, "bell.qasm", "-B")
```
As a further alternative to a OpenQASM file or an inline OpenQASM source, it is also possible to start from a Qiskit quantum algorithm and
transpile to OpenQASM:
```python theme={null}
from qiskit import QuantumCircuit
# Create Qiskit bell circuit with measurement over both qubits
circuit = QuantumCircuit(2, 2)
circuit.h(0)
circuit.cx(0, 1)
circuit.measure([0, 1], [0, 1])
Bell_source = circuit.qasm()
```
Enjoy exploring the possibilities of quantum computing with the Intel® Quantum SDK.