> ## Documentation Index
> Fetch the complete documentation index at: https://docs.qbraid.com/llms.txt
> Use this file to discover all available pages before exploring further.
# Environment Manager
> Install, create, share, and manage Python virtual environments for quantum computing.
The [Environment Manager](https://youtu.be/LyavbzSkvRo) is a streamlined quantum software package and virtual
environment management system provided to qBraid end-users through a simple, intuitive graphical user interface.
It offers curated development environments over a range of quantum applications.
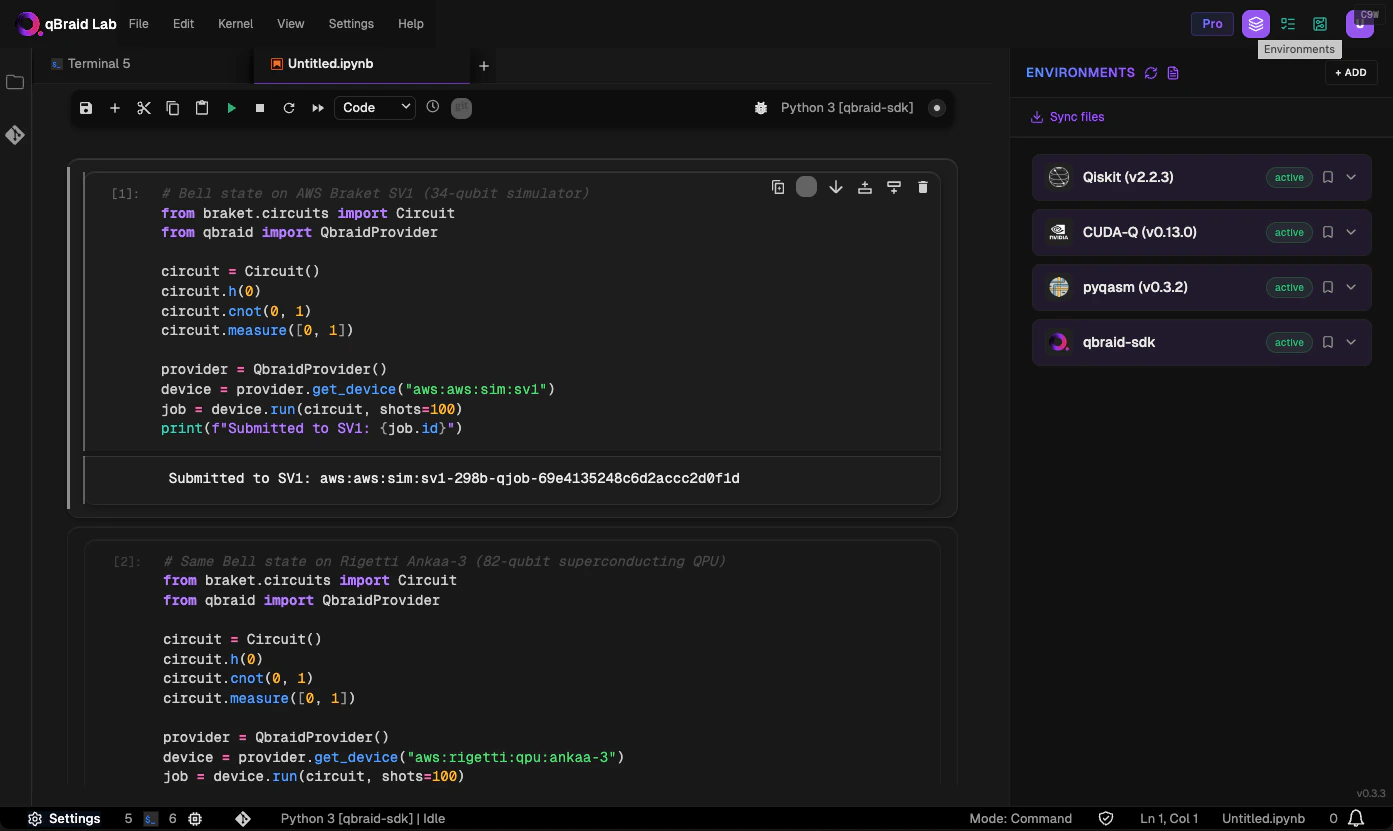
Click the **Environments** icon in the top-right of the Lab console to open the Environment Manager sidebar and view
your currently installed environments.
## Install environment
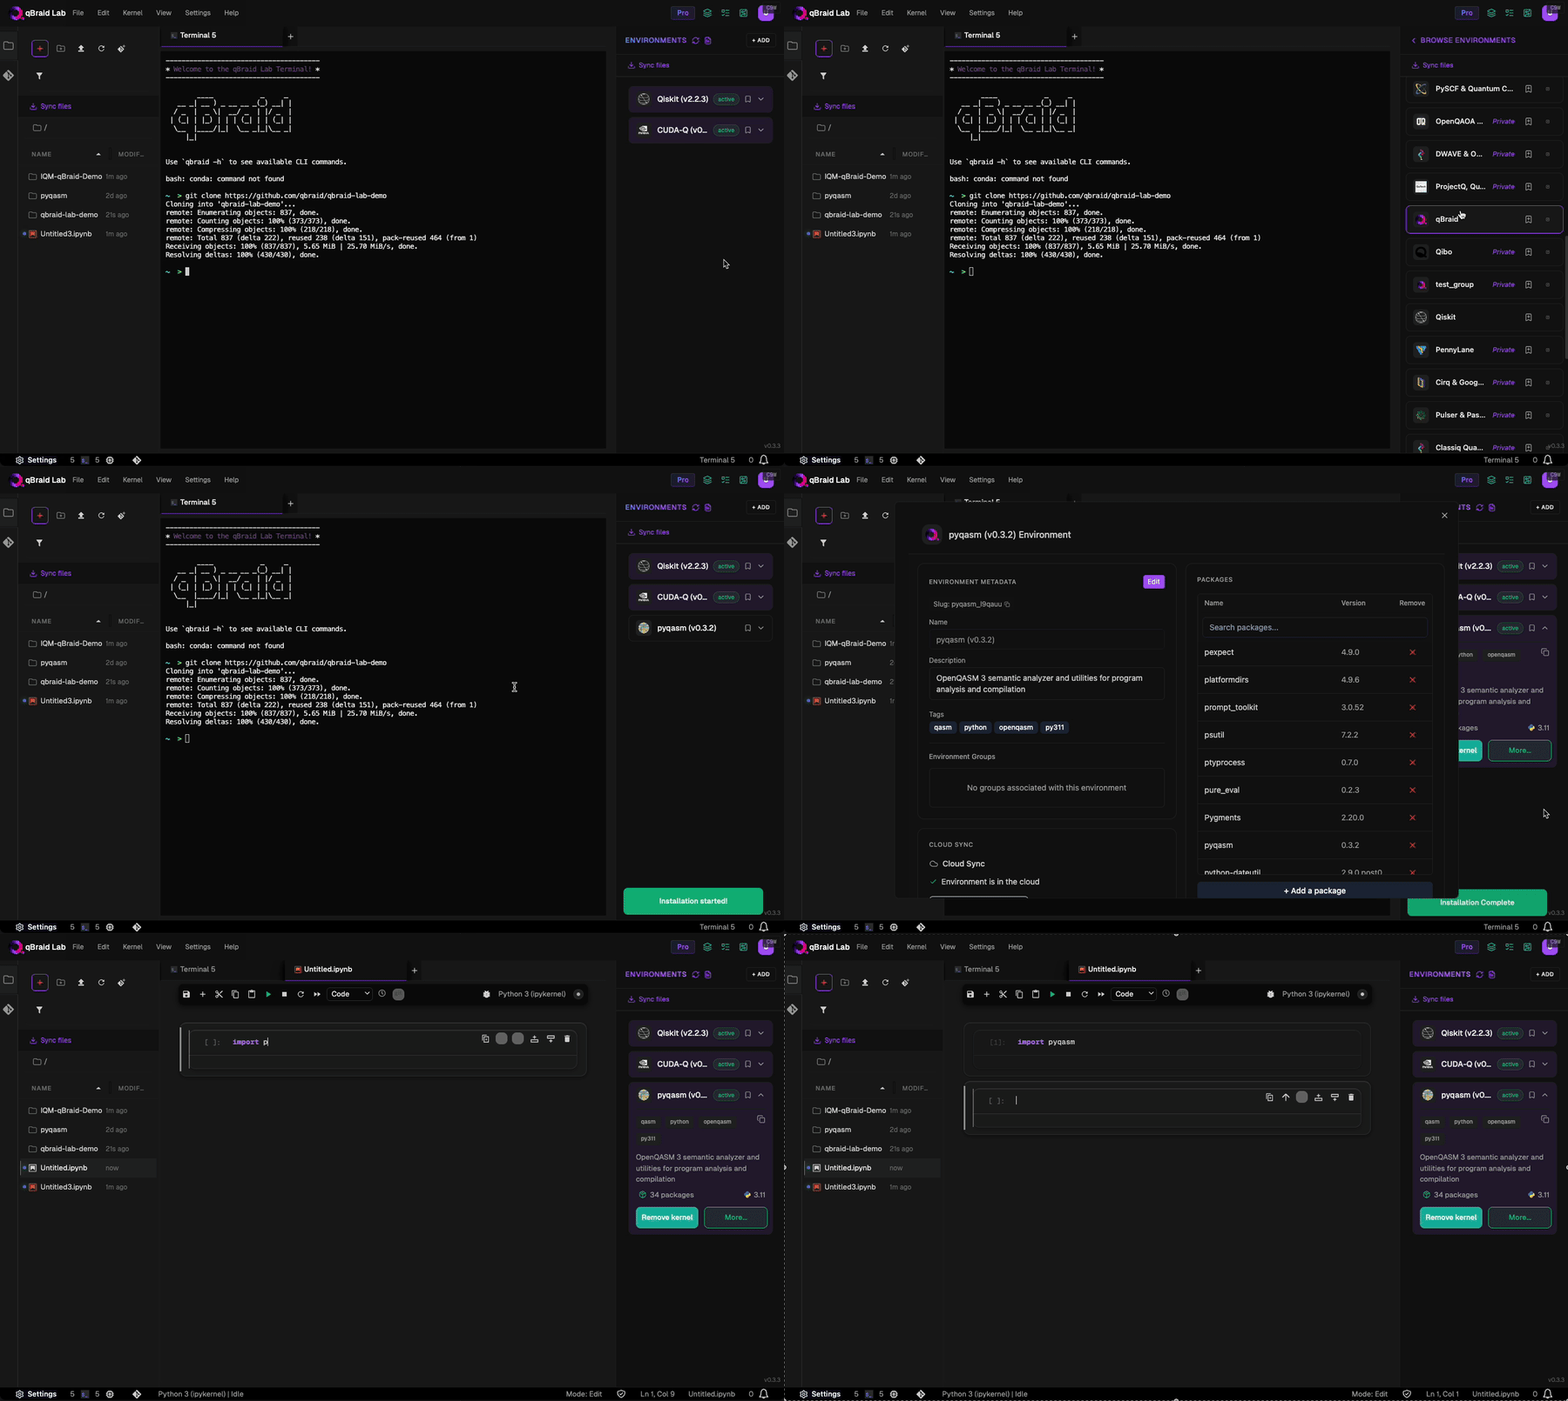
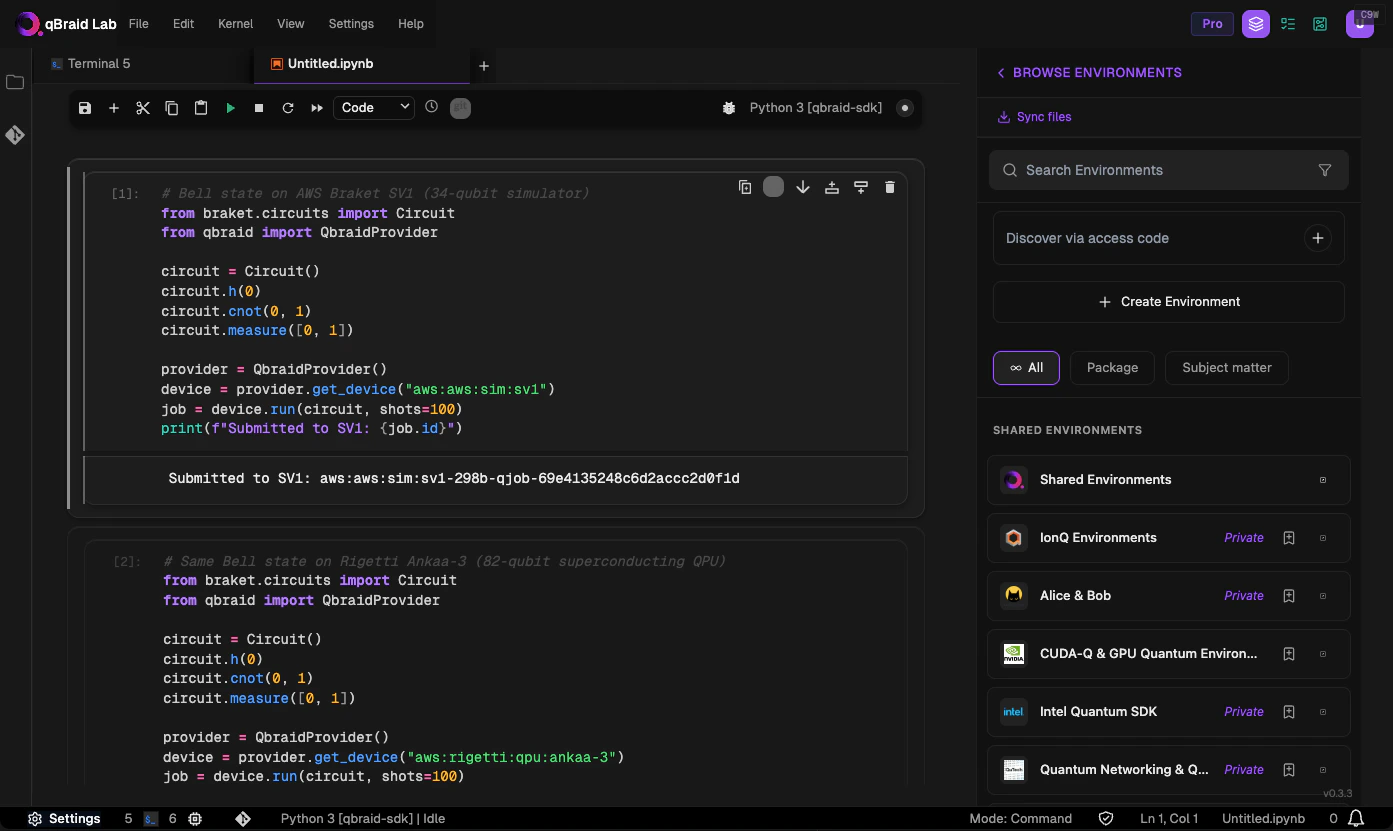
1. In the Environment Manager sidebar, click **Add** to view the environments available to install.
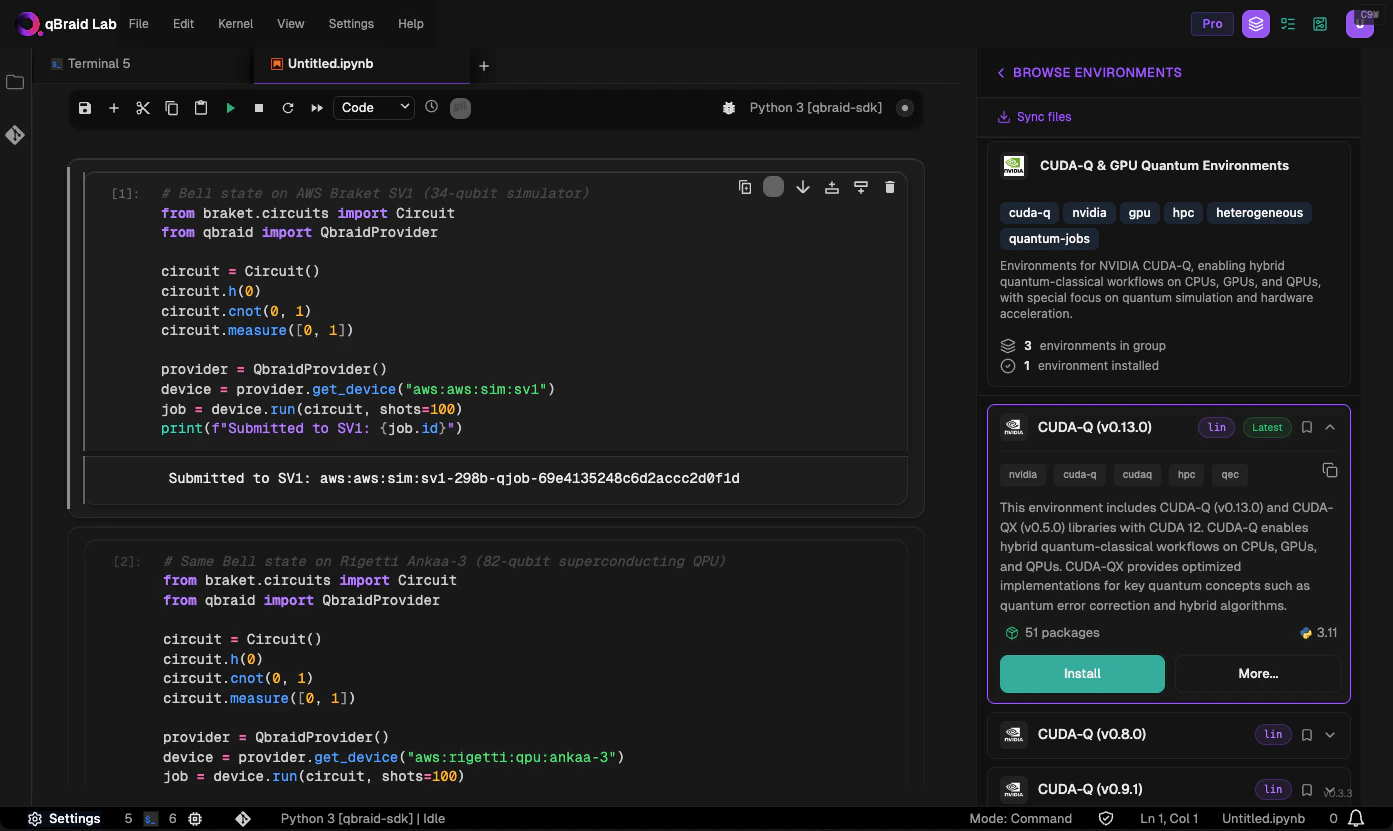
2. Environments are organized into **groups** (e.g. Qiskit, CUDA-Q, Pennylane). Click a group to view the environments it contains.
3. Choose an environment, expand its panel, and click **Install**. Once the installation has started, the panel is moved to the **Environments** tab. Click **Browse Environments** to return to the **Environments** tab and view its progress.
4. When the installation is complete, the environment panel's action button will switch from **Installing…** to **Add kernel**.
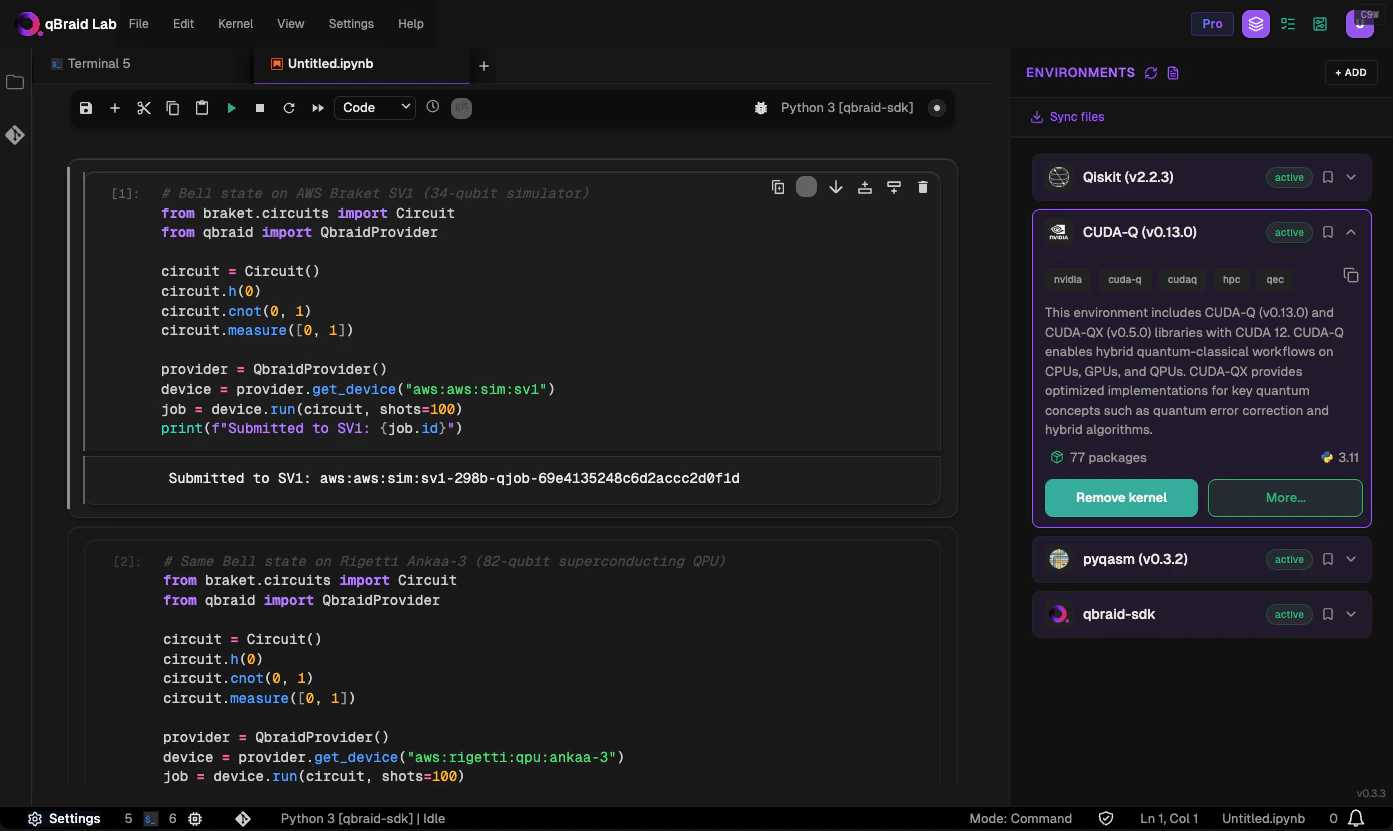
5. Click on the expanded environment tile to view its description, tags, package count, and Python version.
From here you can **Add kernel** or **Remove kernel**, and click **More…** to open the full environment editor.
### Filter environments
Use the toggle buttons at the top of the environment browser to switch between filter modes:
* **All** — show all available environment groups
* **Package** — filter by the primary quantum software package (Qiskit, Pennylane, Cirq, etc.)
* **Subject Matter** — filter by quantum computing domain (Chemistry, Machine Learning, Error Correction, etc.)
You can also type in the search bar to find environments by name or keyword. Use the **Discover via access code** field to add privately shared environments.
### Browse an environment group
Click on any environment group to view the environments inside it. Each environment tile shows its name,
description, tags, package count, and an **Install** button.
### Discover via access code
Environments shared via access code are not publicly listed. To install one of these private environments, first enter the access code
in the "Discover via access code" field and click the "**+**" button. This will add the environment to your sidebar. You can then enter
the environment name in the search bar or scroll to find it, and proceed with step 2 above to install it as usual.
If the environment doesn't appear in search results after entering the access code, click **Browse Environments** to go back to the
main sidebar, click the **Refresh** icon, and then click **Add** to return to the search page and browse for the environment again. If the
issue persists, ensure that you've entered the correct access code and are searching for the correct environment name. If you continue to
experience problems, please [contact our support team](mailto:contact@qbraid.com).
## Create environment
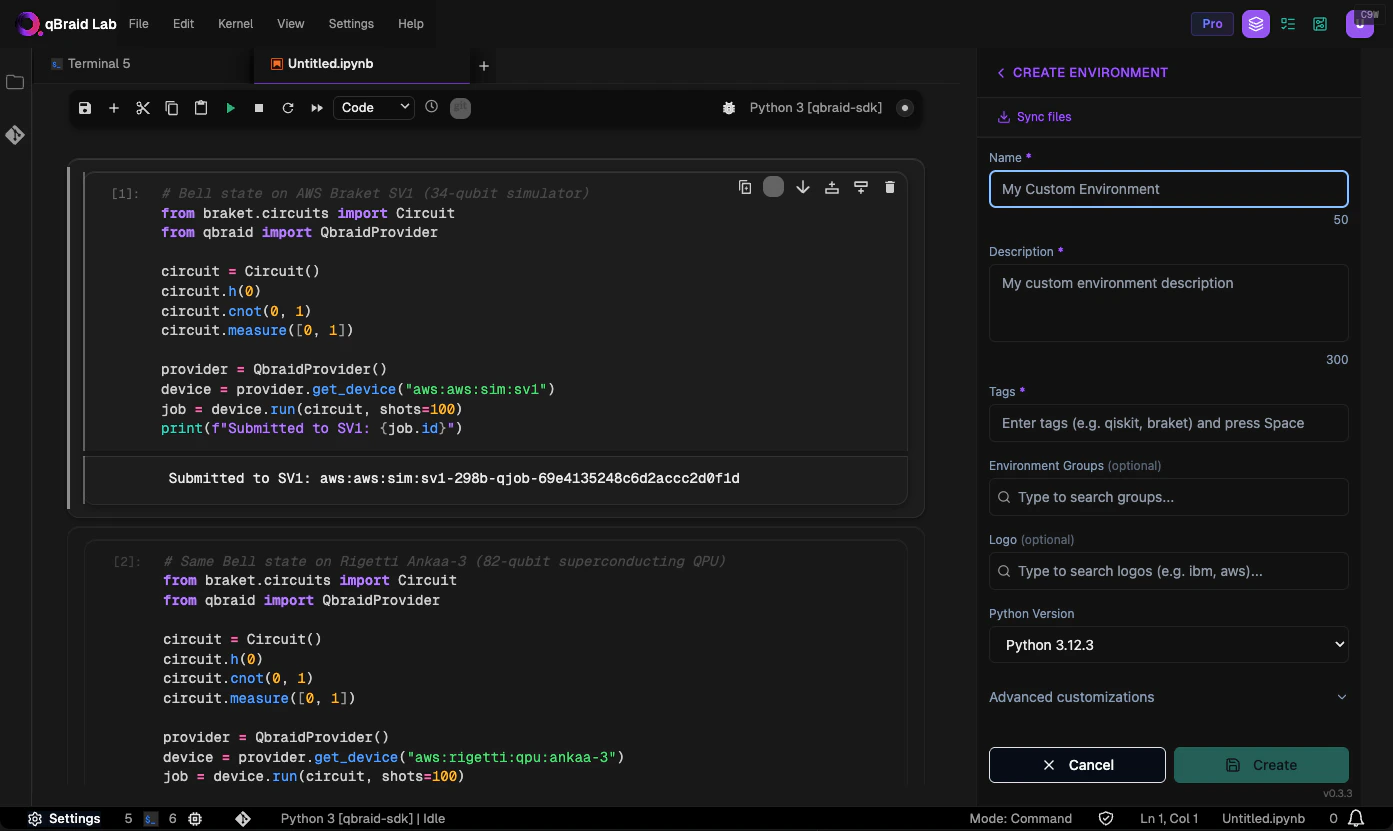
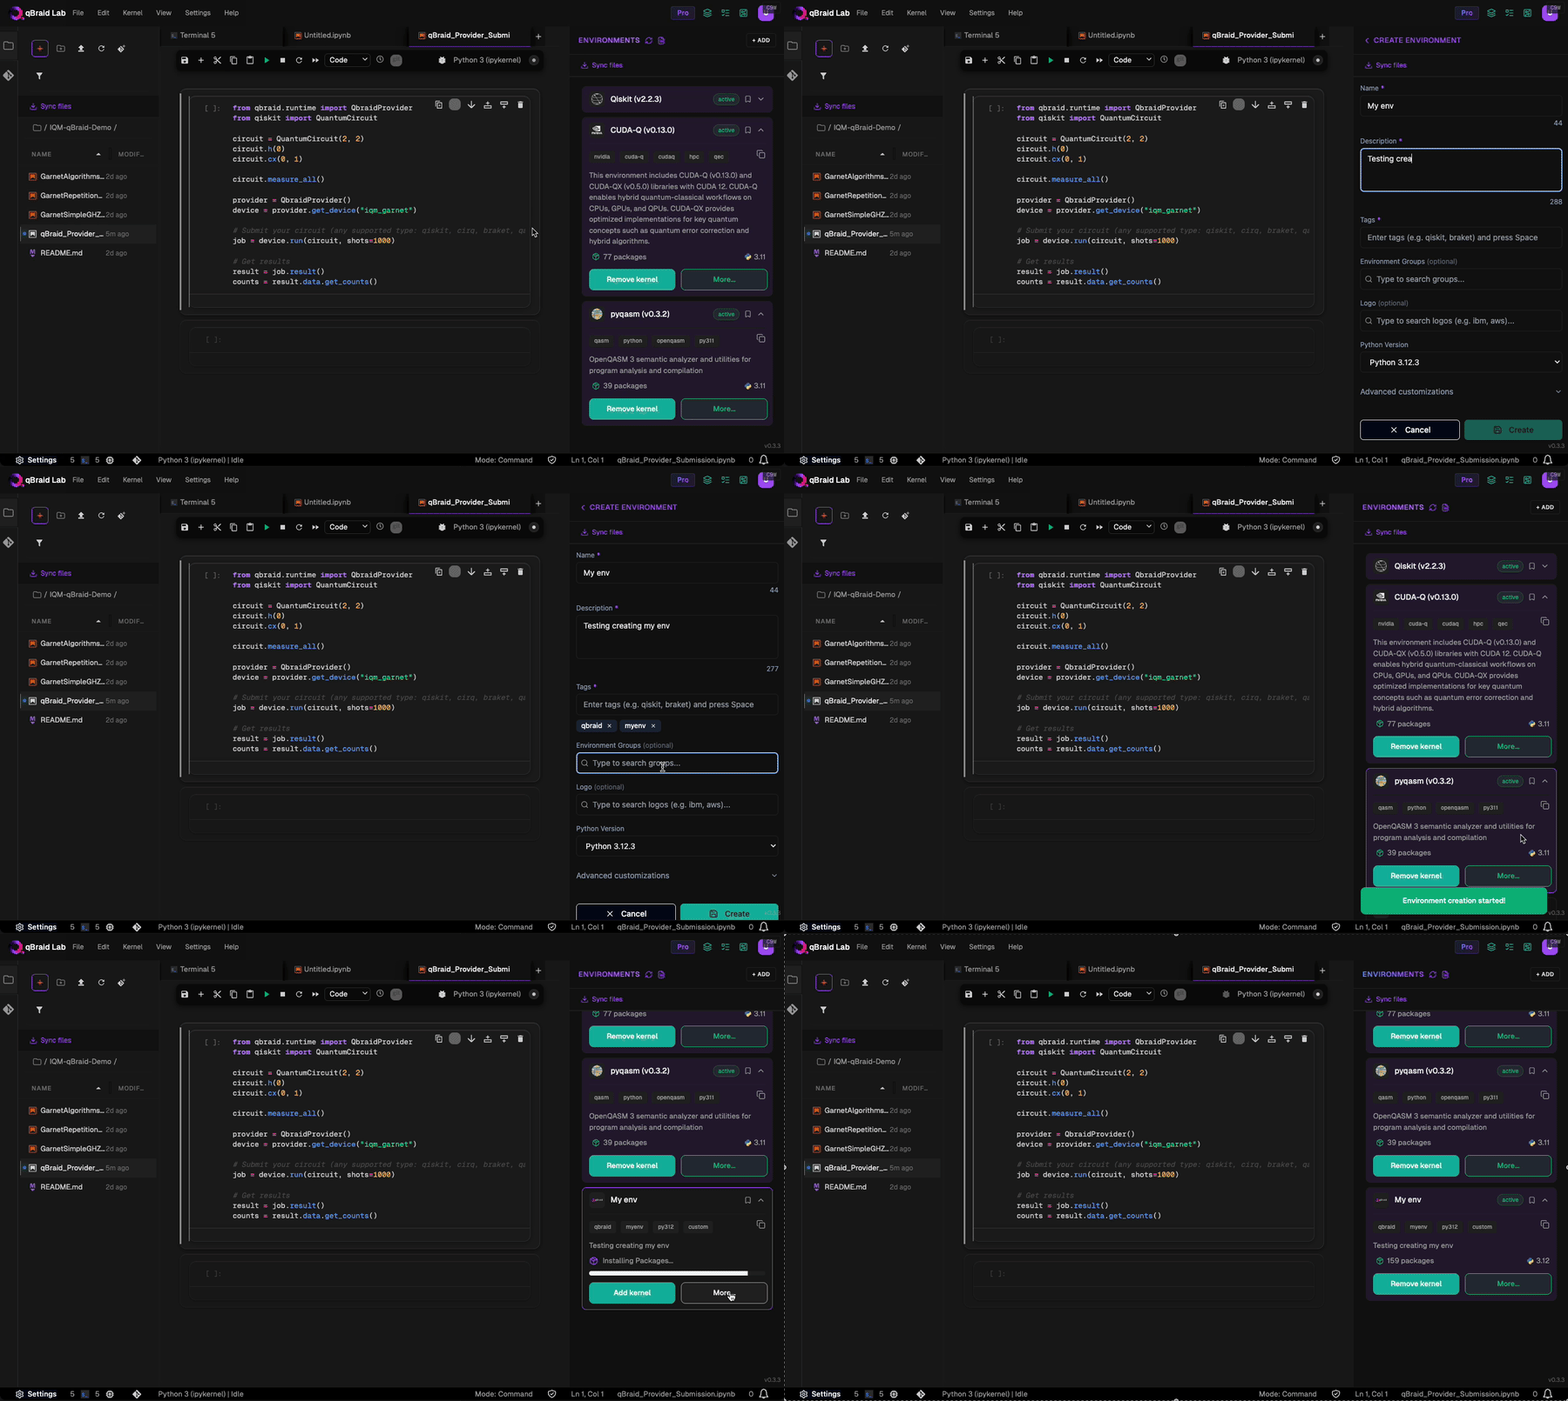
1. In the Environment Manager sidebar, click **Add**, then click **Create Environment**.
2. Give your custom environment a name, description, add tags, upload a logo, and specify any packages to install using
a `requirements.txt` format.
After clicking **Create**, a new environment panel is created for your custom environment. You can view the environment's
install progress by returning to **My Environments**.
3. Once the environment has been created and any package installations have finished, the environment panel's action button
will switch from **Installing…** to **Add kernel**, and the installed packages number will be updated.
4. Click on **More** to verify/view the environment's list of installed packages. You can use the search bar or scroll through
the Python package (pip) list to find the exact versions of all packages and package dependencies that were installed. From the
**More** pop-out, you can also install additional packages, remove packages, add/delete tags, and edit the environment's description.
### Clone environment
You can create a custom environment based on an existing one by cloning it. Clicking the **Clone** button will automatically populate the
`requirements.txt` file and other environment metadata in the "Custom Environment" form. This is useful, for example, if you want to make
and share changes to an environment you don't own.
## Environment editor
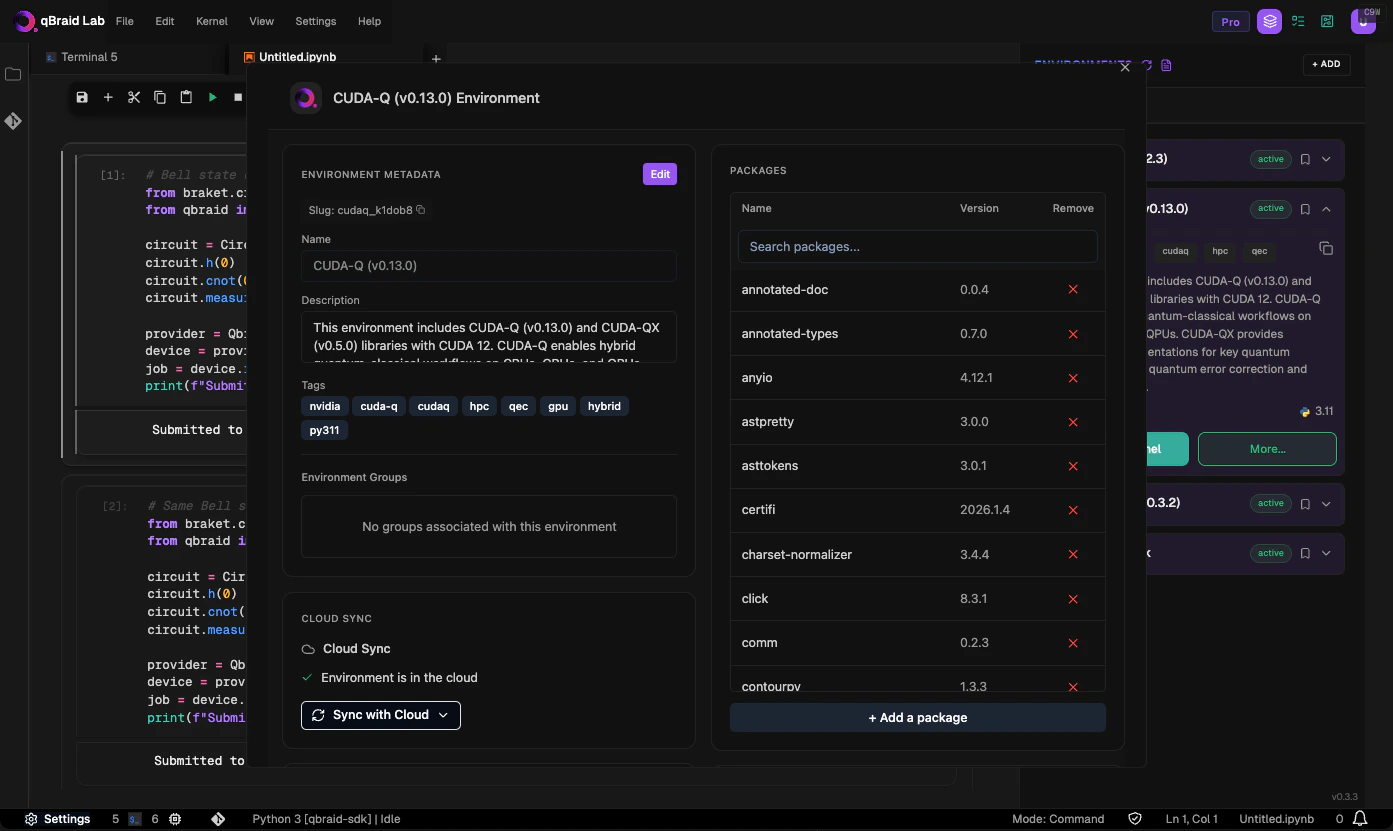
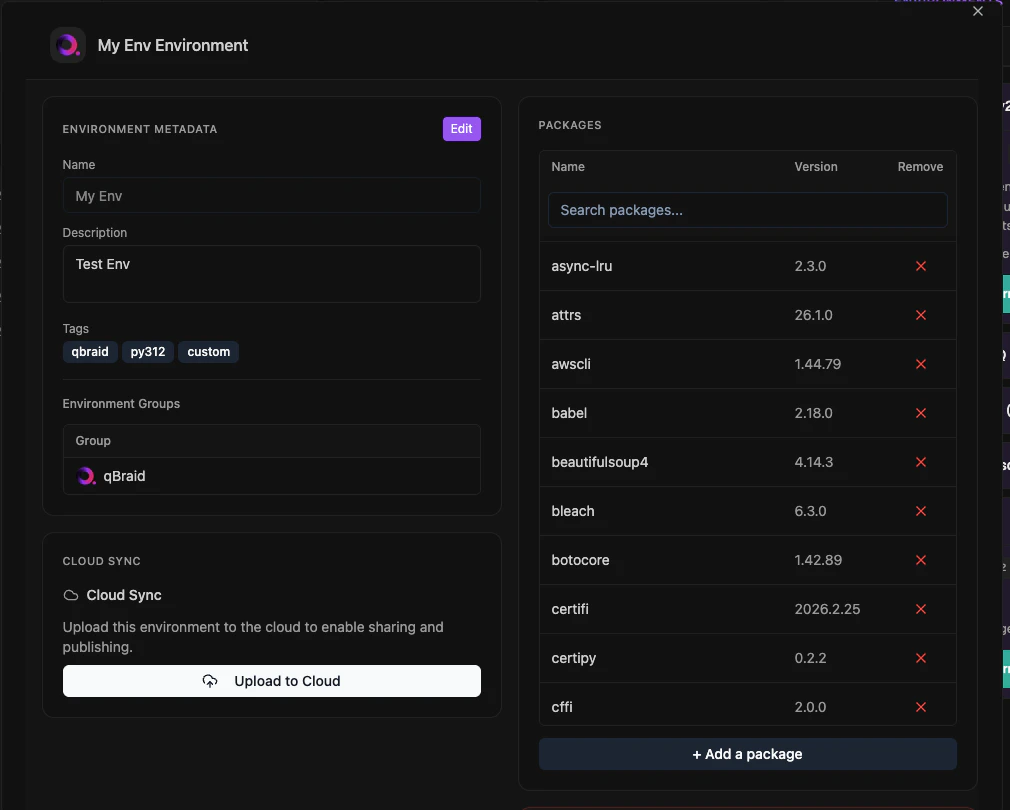
Click **More…** on any environment tile to open the full environment editor. From here you can:
* View and edit environment **metadata** (name, description, tags)
* Browse the full **packages list** with search, version info, and remove buttons
* **Add a package** — search PyPI and install the latest version
* **Cloud Sync** — sync the environment to the qBraid cloud for sharing
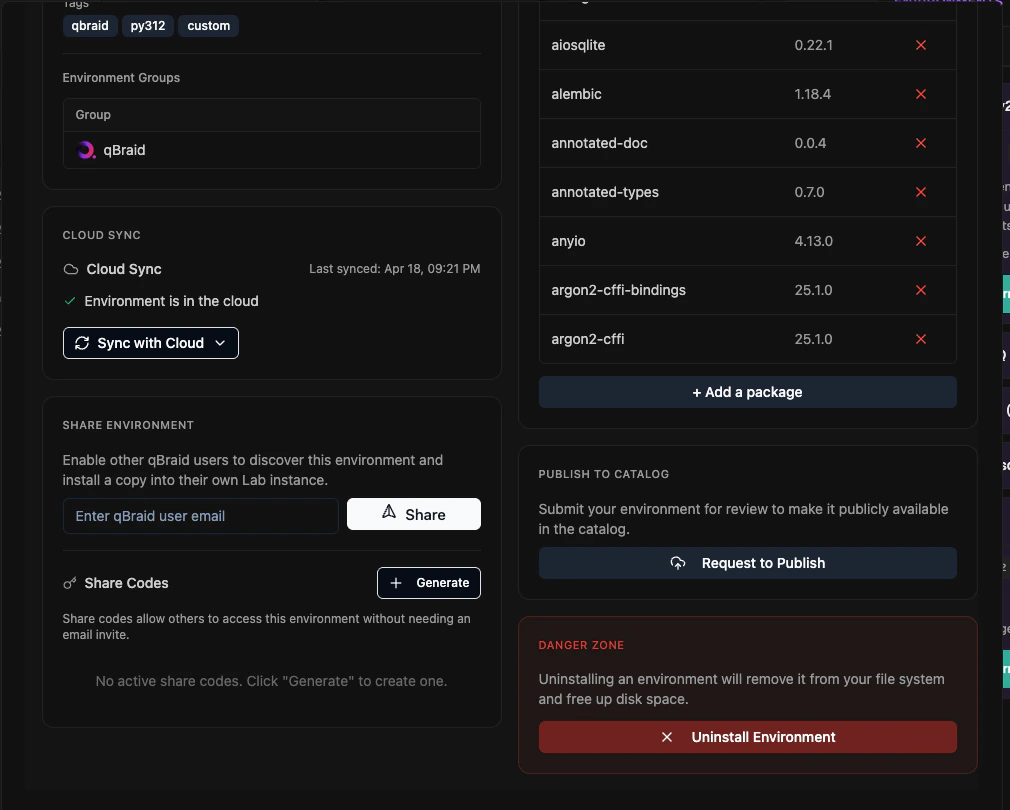
* **Share** the environment with other users via access code
## Upload to cloud
Before you can share or publish an environment, you must first upload it to the qBraid cloud.
In the environment editor, scroll to the **Cloud Sync** section and click **Upload to Cloud**.
Once uploaded, the status changes to "Environment is in the cloud" and the button becomes **Sync with Cloud**
for pushing future updates.
## Share environment
In qBraid Lab, you can share your custom environments with other users. This will make your environment visible under their **Add**
environment list. They can then install it, and run code using an exact copy of your environment. This includes support for quantum jobs
and any additional configurations.
To share a custom environment, first click the **More** button in the drop-down to open the environment editor. Then, under 'Share Environment',
select **Generate Access Code** to create a unique access code. Anyone with this code will be able to
[discover](#discover-via-access-code) and [install](#install-environment) the environment with read-only access.
When you share an environment via access code, you're creating a snapshot of your Python virtual environment
with its specific configurations and installed packages. This snapshot is uploaded to the qBraid cloud, creating a static version accessible
to other users. This shared version remains unchanged, even if you make updates to your local environment. To reflect any changes, you'd need
to generate a new access code and overwrite the existing version in the cloud.
Overwriting a shared environment doesn't affect versions that other users have already downloaded. Instead, an indicator notifies them
of the availability of an updated version. Currently, users must manually check for this indicator. Also, before installing an updated version,
users must uninstall their current one as maintaining multiple versions of a shared environment isn't supported.
## Publish environment
Make your custom environment accessible to the entire qBraid ecosystem by submitting a publish request. Once you've configured your environment to
meet your specifications, open the environment editor using the **More** button and select **Request to publish**. A qBraid admin will review and
test your environment as needed, providing feedback if adjustments are required. Once approved, the environment will be made public, and ownership
will be transferred to qBraid.
## Install new package
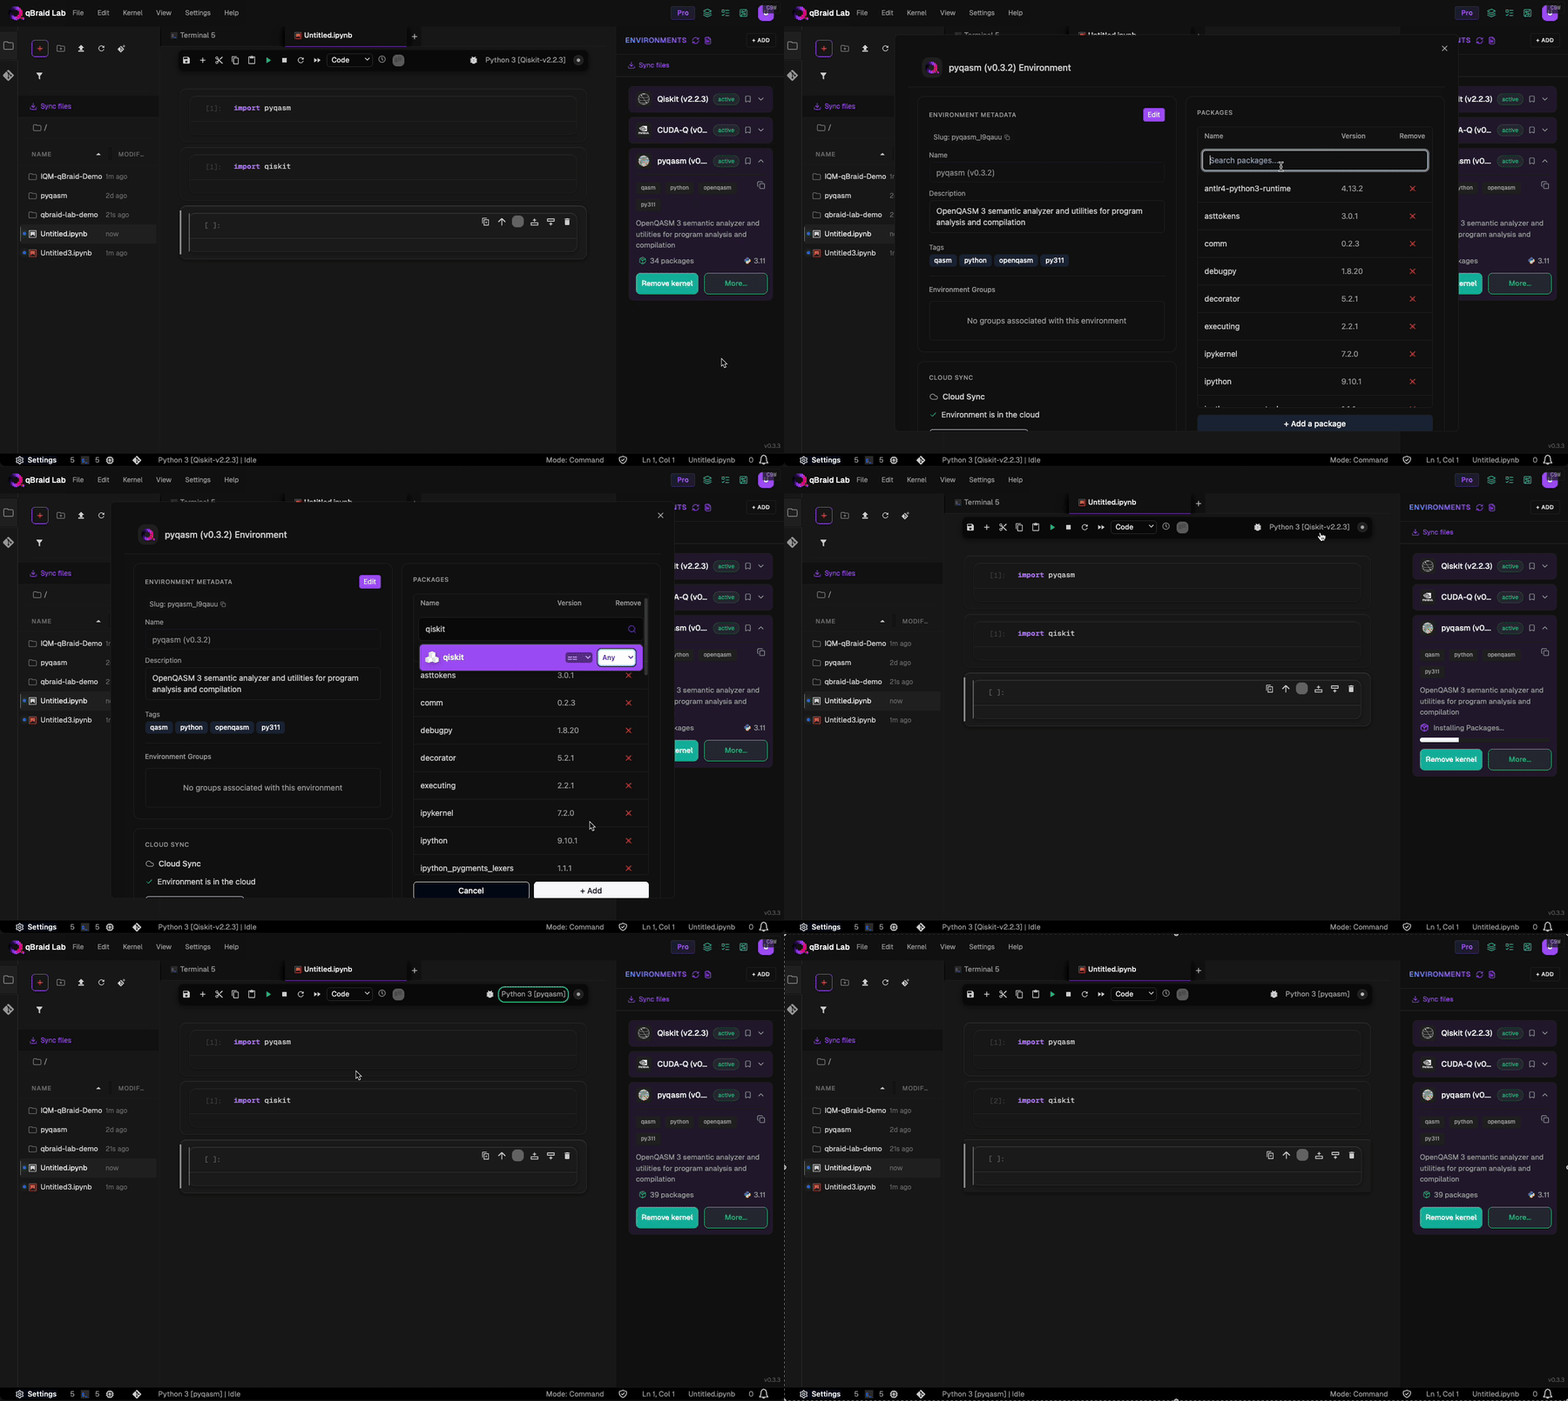
Find the environment into which you want to install the package, expand the environment panel using the carrot drop-down, and then click **More**.
At the bottom of the Python packages list, click **Add a package**. Type in the *exact* name of the package you wish to install into the "Add package…"
search bar, and then hit `Enter` (or click the search icon on the right). This will do a direct search through [PyPI](https://pypi.org/), and return the
*latest* version available to install. To accept, click on the package, and then click **Add**.
While installing, the environment action button will indicate **Installing…**. Once complete, Lab will notify with a pop-up.
Package installation is blocked while file sync is in progress. Wait for sync
to complete before installing or removing packages.
## Uninstall / cancel install environment
To uninstall an environment or cancel the installation of an environment, click on **More**, and then **Uninstall** or **Cancel Installation**.
Uninstalling an environment also removes its kernel from the launcher. Any
notebooks using that kernel will need to be switched to a different kernel.
## Activate environment (kernel)
Clicking **Add kernel** creates a new ipykernel, see [Add/remove kernels](/v2/lab/user-guide/kernels#add-and-remove-kernels) for more.
## Permissions
Some features, such as [publishing environments](#publish-environment), require an Enterprise-level subscription or partnership.
For more information, visit our [subscriptions page](https://account.qbraid.com/account/wallet) or contact us at [contact@qbraid.com](mailto:contact@qbraid.com).